Author’s note, 2015-02-14:
- Based on the interest I’ve received in this project, I’m considering selling plans for a stove similar to the one described in this article. See the Rocket Stove Plans section at the end of the article and let me know if you’d be interested.
Original article:
For some time I’ve been considering the best way to deal with a pile of scrap wood that has been growing next to my home, the result of many woodworking and carpentry projects I’ve been involved in over the years. A few options I have considered are:
- taking it to the landfill
- cutting it into chips and using it as mulch
- burning it
From a climate change standpoint, the latter of these is surprisingly the least harmful in the long run. Mulching or burying do postpone carbon release to the atmosphere, but the carbon will be released eventually regardless. What’s worse, mulching or burying the wood will result in some anaerobic decomposition (that is decomposition in an oxygen deprived environment) which will result in the production of methane, a far more harmful greenhouse gas than carbon dioxide.
Burning also has a side benefit. It releases energy which may be captured and put to some use. Scrap wood and yard trimmings are burned in backyards across the country each year without any attempt to capture that useful energy. Rather than simply “disappearing” my pile of scrap wood, I wanted to extract as much value as possible by heating my home with it. To do so most efficiently, I built an ultra-efficient wood burning stove, more commonly referred to as a “rocket stove’. Rocket stove designs are most often used for small cook stoves but larger stoves for home heating are not unheard of. They are often referred to as rocket mass heaters.
Ads by Google
Warnings
Fire is dangerous. Building and operating your own wood stove of any design will almost certainly void any fire insurance you may have on your home and may also pose a serious risk to you and your family. As far as wood stoves go, a rocket stove is probably one of the safest designs since the combustion chamber is tiny, the exhaust volume is low, the draft is strong, and the bulk of the exterior of the stove does not reach very high temperatures. However, as with any combustion appliance, there are some precautions you should follow.
0. Locate the stove well away from anything flammable. At least 18″ is recommended by most building codes for ordinary fireplaces and wood stoves.
1. Keep a watchful eye on your stove whenever it’s burning. With an average load of wood my stove burns for about 30 minutes before requiring more fuel. I consider this short burn time to be not a burden but a safety feature, and I don’t mind it at all since there’s a certain pleasure that comes from putting another log on the fire.
2. Don’t burn treated or manufactured woods. Treated wood, plywood, OSB, etc all contain chemicals that will be released into the exhaust during combustion. You certainly don’t want to breath these and you probably don’t want to put them into the atmosphere. You should only burn untreated solid wood.
3. Install a smoke detector. Smoke detectors are required by most building codes, so you probably already have one. However, if you build a rocket stove for heating a garage or outbuilding, you should probably install a smoke detector there as well.
4. Install a carbon monoxide detector. All combustion appliances are capable of producing carbon monoxide which can be deadly if it is released into your home. Other combustion appliances in your home such as a furnace or hot water tank are probably a greater carbon monoxide threat that the rocket stove described in this article since they operate continuously, unattended, even while you sleep. That said installing a carbon monoxide detector is a wise precaution.
How is a rocket stove different from a regular wood stove?
The goal of a rocket stove is to burn a relatively small amount of wood at as high a temperature as possible, resulting in more complete combustion, and to extract as much heat as possible from the exhaust gases. To generate high combustion temperatures, rocket stoves separate the combustion, heat extraction and exhaust functions. They have insulated internal chimneys to generate a strong draft for vigorous combustion. My design uses a down draft combustion chamber. Scrap wood is loaded directly on top of the existing burning wood inside the combustion chamber. The flame is drawn downward by the strong draft rather than rising out of the chamber as one might expect. The result is that ALL combustion products pass through the hottest part of the fire resulting in very complete combustion, producing the greatest amount of heat and reducing products of incomplete combustion such as carbon monoxide and smoke. To capture as much of the heat as possible and radiate it into the room, the exhaust gases are passed through a secondary chamber (much larger than the combustion chamber) that absorbs and radiates the heat. Finally the relatively cool exhaust gases are expelled through an exhaust tube.
The following illustration shows the basic design.

Insulating the chimney ensures a large temperature difference between the exhaust gases inside the chimney and those outside it. This temperature difference causes a density imbalance resulting in a strong draft. The hot exhaust gases in the chimney rise, while the cooler exhaust gases outside the chimney fall, and the whole process draws fresh air into the combustion chamber, supporting vigorous combustion. In my design, the radiating chamber is about 18″ in diameter by about 36″ high, while the combustion chamber is only about 4″ by 4″ by 10″. Don’t let the overall size of the stove fool you. It only burns a couple handfuls of wood at a time. The large size is required to absorb and radiate the heat, not to contain the fuel.
Ads by Google
Construction
Rocket stove mass heaters are often built from steel drums. These are convenient since they have a flat top that can also be used for cooking. I did not have one handy though. What I did have was my parents’ old electric hot water tank that they had just replaced since it was corroded and leaking. In addition to this I used some 3″ diameter steel pipe, some 4″x4″ square tubing, and some flat steel plate, all about 1/8″ wall thickness (though that is probably thicker than necessary). I also used some flexible aluminum tubing (dryer ducting) to feed the exhaust from the rocket stove into my existing fireplace.

Above is a picture of the internal parts of the stove (combustion chamber and chimney) set up for initial testing to make sure it would generate enough draft for vigorous combustion. The aluminum flex tubing is connected to the top of the chimney for testing only. In the finished product it will be connected to the side of the stove. The chimney is insulated with about 1″ of Roxul (a rock wool insulation that will tolerate higher temperatures than fiberglass insulation) and wrapped with adhesive aluminum furnace tape to hold the insulation in place.

The above image shows the hot water tank cut to accept the combustion chamber and chimney.

The above image shows the combustion chamber and chimney being welded into the side of the hot water tank. Note the block of wood between the end of the chimney and the inside surface of the tank to ensure an appropriate gap for the exhaust gases. This piece of wood will be removed after the chimney is welded in place.

Mad scientist at work…

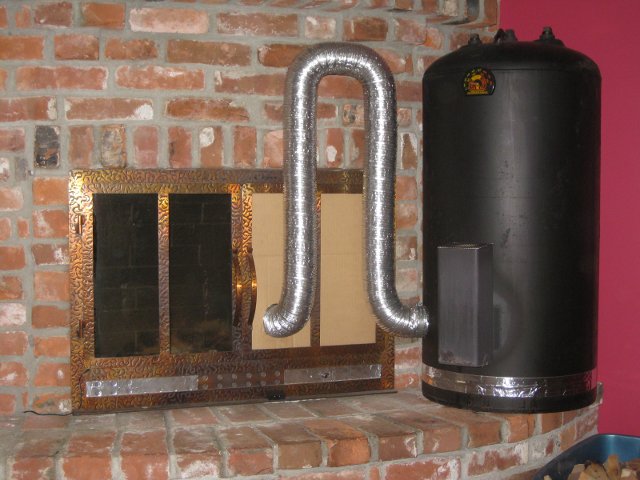
… and after a bunch more welding and a paint job that I neglected to take any pictures of … viola! … the finished product. The silver band around the bottom isn’t a racing stripe. It covers the seam where I tack welded the bottom of the tank back on. I did not want to weld it on permanently since I may want to disassemble the stove later for inspection.

Notice that I removed a glass pane from the left door of my fire place and replaced it with cardboard. The aluminum flex tube passes snugly through a hole cut in the cardboard to expel the exhaust gases into the fireplace where, still warm, they rise and exit through the existing chimney. I know you’re probably thinking I must be crazy to use a combustible material like cardboard for this purpose, but the fact is that the exhaust volume from this stove is so low and the stove is so efficient at removing heat from the exhaust that this aluminum tube reaches a maximum temperature of only about 60 degrees C during operation. That’s cooler than a typical cup of coffee. The top of the stove gets much hotter, of course.

I also made a simple metal screen that can be placed over the combustion chamber to prevent sparks from popping out into the room where they could ignite something (or more likely just leave burn marks as they smolder on the carpet). I have another cover, not shown, that is a solid steel plate. It’s useful to quickly extinguish the fire and to prevent air infiltration when the stove is not in use.

Above is a photo of the cleanout. The plate which makes up the bottom of the combustion chamber is removable. I just slide it out as shown in the photo and the ash drops into any suitable receptacle (I’m using a plastic tray above). I’ve found it best to clean the ash out every week or so as once there is more than about a cup full it will fill the bottom of the combustion chamber and start to build up in the tube between the combustion chamber and the internal chimney. Then it’s a little harder to get to and it will eventually start to reduce the draft. In hindsight, access through the side of the combustion chamber instead of the bottom would have been more useful.
Does it work?
Well… actually … it works too well. The difference between burning wood in the fireplace and burning wood in this stove is incredible. You really have to experience it to believe you can get so much heat from a small handful of wood. I’ve fed my fireplace for hours with hardly any change in room temperature but it only takes a few minutes for the rocket stove to raise the room temperature noticeably. It may take a long time to get through all my scrap wood at this rate. Feeding the stove every evening after work, I have only managed to go through about one bin (perhaps 20kg) of wood per week. Part of the issue is the season. It just doesn’t take much heat to get the house to a comfortable temperature right now in early spring. I will be able to burn a lot more wood in the stove next winter.
Savings
On average the heat energy available from burning wood is around 4.5 kWh per kg (assuming a 20% moisture content). Assuming roughly 80% efficiency of the stove (just a rough guess) the heat extracted will be about 3.5 kWh per kg. I heat my home with electricity that costs about $0.07 per kWh. Therefore, the heating value of my scrap wood is about $0.25 per kg and by burning about 20kg per week I save about $5 per week on heating costs or about 50% of my heating bill for this time of year. Savings will be much greater in winter when the stove can be operated more frequently without the room becoming uncomfortably hot.
Why not just buy a fireplace insert?
I considered buying a fireplace insert but after learning about rocket stoves I quickly dismissed the idea because:
- an insert would almost certainly be less efficient
- it would require significantly more cost and effort to install
- it wouldn’t provide nearly the same conversation value
- I would not be able to re-purpose existing waste material such as my parents hot water heater
- it would not be portable (I look forward to operating my rocket stove on our patio on cool summer evenings).
Ads by Google
What about adding thermal mass? Would that be more efficient?
Wood stoves used as a primary heat source for a home will derive significant benefits from thermal mass (imagine replacing my short length of aluminum flex tube with 30 or 40 feet of duct buried inside a couple tons of concrete and you’ll have the right idea). The thermal mass stores heat and releases it slowly into the home, evening out the temperature and allowing the stove to be operated intermittently.
However, for a stove like mine that’s used only for supplemental heating, thermal mass is not of much benefit since an even temperature can be maintained simply by varying the heat input from the primary system (which happens automatically since it is controlled by a thermostat). For example, when I operate my rocket stove in the winter, my electric heaters automatically cut back such that the house temperature does not rise significantly.
It is also worth noting that thermal mass, by itself, does not improve efficiency. Improved efficiency is often a side effect of adding thermal mass, but the improvement is really just a result of extracting more heat from the exhaust gases. This could be accomplished just as easily without adding any thermal mass. For example, I could extract more heat from my exhaust simply by using a longer piece of aluminum duct between the stove and fireplace (I have noted that the exhaust temperature drops about half way to ambient for every 20cm of tube length).
So in a nut shell, thermal mass is not really that useful for a stove that’s intended for use only as supplemental heat, if the primary heating system is on a thermostat.
Additional resources
There is a lot of information about rocket stoves online. A Google search on “rocket stove” or “rocket mass heater” will yield good results but www.rocketstove.org is a good place to start. There is also an excellent book called Rocket Mass Heaters available for purchase in PDF format at www.rocketstoves.com.
Paul Wheaton, founder of permies.com has put together an extensive set of DVDs on Rocket Stoves, available on Amazon, titled Wood Burning Stoves 2
Erica and Ernie Wisner, of ernieanderica.info, who were also involved in producing the DVDs above, will be launching a new book in June of 2016. You can pre-order it on Amazon: The Rocket Mass Heater Builder’s Guide
Rocket Stove Plans
Update 2015-02-14: A few readers have emailed me asking if there is any way they could purchase detailed plans so they can build a stove similar to mine or get a welder to build one for them. I don’t currently have any such plans to offer, but if there is enough interest, I would consider building an improved stove (I’ve learned a lot from using this one for the past several years) and documenting the process in more detail with the intent of selling the plans. To gauge interest, I’ve created the following very brief survey.
Reader Projects
If anyone out there decides to build a rocket stove based on this or a similar design, I would be happy to post some pictures of your project, or if you have your own site, let me know and I will post a link below.
2010-12-13: One reader, Brent, built his own rocket stove following a similar design (though he was clever enough to put the cleanout in the side of the combustion chamber rather than the bottom). You can read more about his stove in the comments, or take a look at some pictures and a video on Brent’s blog: http://streetjesus.blogspot.com/2010/12/rocket-mass-heater-project.html.
2012-11-26: Another reader, John, sent me these pictures of his project. He’s using a large water reservoir for thermal mass with a coil of copper tubing wrapped around the internal chimney of the stove for heat transfer.


Happy burning!
Great post! You really inspire me into testing these things myself, I have thought about making a school project about something like this, it’s the finnishing project and it’s a course of 100 hours. Do you have any suggestion what I can build? 😉
Hi Fredrik,
There are a lot of interesting projects on this site. I would suggest picking one that interests you the most or inventing something of your own. You may also check out http://www.instructables.com for thousands of projects that might be suitable. Sorry I can’t really help you much without knowing what your particular interests and skills are. Good luck.
absolutely the condensation of what I have learned about stoves, and in particular rocket stoves, over the past years.
great job, might finally convince me to take the jump on building one too
the simplicity of the design is enchanting
I have a few stray propane gas tanks laying around, would be excellent for the application
The portability enchants me too:
this is for a water sports club house, and during summer we have no room to spare
In my design, I would heighten the wood holding chamber to be able to feed long sticks, cover the top of it and then add an adjustable exterior air supply (so as to not use already heated interior air), maybe even a forced one with a small fan
where mass storage is concerned, please search wikipedia about heat storage capacity of materials:
it turns out that water is the best choice, about 3-4 times better than any solid material, so much smaller footprint
but be careful with pressure build up, especially if water should turn into steam
explosion risks are very real
better to leave it all athmospheric
please comment and send me an e-mail if you do,
as I am not familiar with RSS feeds
thank you very much for posting this
Hi Frank,
I agree drawing in outside air would be more efficient. I considered it but it was not very practical considering the location of the stove in my home. Adding a fan was a consideration too. I had thought about running 30 or 40 ft of exhaust duct down into my crawlspace to extract even more heat from the exhaust, but that length of tubing would add significant resistance, reducing the natural draft. I figured in that case I could put a fan on the end of the exhaust tube. It’s better to suck the exhaust through the system rather than blow it through, or you risk exhaust leaks into your home. I also considered installing an oxygen sensor (like the ones used in automotive fuel injection systems to determine the proper air fuel ratio) and adjusting fan speed based on the sensor output. I may experiment with such things in the future but for now the simplicity of my first design can’t be beat.
For heat storage, I also agree there is nothing better than water. There are a few materials that will store more heat in less volume but the are expensive and relatively exotic (compared to water), storing energy via phase change or chemical reaction rather than a simple temperature rise. There are a few issues with using water though. First, there is the risk of leaks and corrosion. If you want a maintenance free system that will last decades, water is a poor choice. Second, it’s not easy to store water in a way that creates usable space. Although you need more volume to store the same heat, solid mass storage can more easily be built into the home in the form of walls or floor for new construction, or the addition of an adobe bench or similar usable fixture. Lastly there is the concern you mentioned about pressure build up, but as you say, that is easily solved by leaving the storage tank open to atmospheric pressure.
I had considered building a rocket stove from a natural gas hot water tank, and keeping the tank intact so it could be filled with water, drawing the exhaust through the existing tube through the center of the tank to heat the water, and allowing the tank to continue to radiate that heat for hours after the stove is extinguished. The design would be quite a bit more complicated though and I would have needed to use a non-leaking tank, rather than repurposing a leaking one.
Thanks for you comments. I’ve also emailed you.
Hi Rob,
great job.
why the 4″x4″ square tubing? any reason for square versus round?
Ian
Hi Ian, one reason for square vs round is the simplicity of creating welded joints. Using a reciprocating saw it’s easier to cut a square hole than a round one. A second reason is that most of my wood scraps are rectangular in shape. My main design criteria for combustion chamber size was that I wanted to be able to fit two chunks of 2×4 into it side by side. A 4″x4″ tube with 1/8″ wall turns out to be perfect for that, with 1/4″ to spare for air flow around the 2×4.
Hi Rob,
very thankful for your extremely quick response
within two hours, extraordinary !!!
and for your protection of my identity, though I am not really concerned about this:
progression is my priority
thanks anyway
we seem to agree on the basics
so let’s try and work out a simple and safe way to store the energy
I am convinced it can be done
safely, simply
you have solutioned the most complex part
frank
Most of my scrap wood is in the form of branches falling from trees at my cottage. We collect it then have a big bonfire in the fall and I’ve often wondered how to capture all that heat.
So, using a repurposed gas water tank, the sticks would go into the central gas exhaust pipe. If there we actually water in the tank, the insulated exhaust chimney and the like would be in a second tank?
Hi Don, the design I had imagined for repurposing a gas hot water tank is similar. The insulated chimney is simply inserted through the existing tube through the center of the tank. Another enclosure, a steel drum perhaps (or another electric hot water tank) must be inverted over top of the gas hot water tank. Thus the hot exhaust gases are directed up the insulated chimney through the tank and then back down around the exterior of the gas hot water tank. The lowest part of the steel drum must be sealed (welded to the gas hot water tank). The exhaust exits through a tube at the base of the steel drum. If I find time, perhaps I will put up a picture.
If your fireplace has air supply from outside the house to burn the wood, it’d be better to use that supply for your stove, instead of using air from within the room. Sucking the air from the room would cause flow of the cold fresh air to the room, reducing the temperature and decreasing the net heat gain from burning this wood.
What is the maximum temperature of the radiating surface you noticed when using this stove?
Hi Krzysztof, I agree the efficiency is better drawing air for combustion from outside. Comparing natural gas furnaces, an outside air supply seems to raise the efficiency from around 80% to just above 90%. It’s a feature I am considering adding, but there is no simple way for me to do so since the fireplace does not have an existing outside air supply. Also, the additional tubing would reduce the natural draft, likely requiring addition of a fan.
I just measured these approximate temperatures with an IR thermometer at nearly maximum heat output (values in degrees C): Top center – 200, Side top – 145, Side middle – 115, Side Bottom – 80, Combustion Chamber – 450, Ambient Room Temperature – 20, Adjacent Wall Surface Temperature – 50.
Out of curiosity I also measured the exhaust tube surface temperature. It starts at about 100 next to the stove and drops half way to ambient every 20 cm (ie after 20cm the temperature is about 60, after 40cm it’s about 40, after 60cm it’s about 30). Of course the exhaust inside the tube is hotter than that (the tube temperature should be near the average of the exhaust temperature and the ambient temperature).
Note I said these temperatures were measured at near maximum heat output. I’ve noticed that maximum heat output only happens on windy days when the venturi effect of the wind blowing across the top of the chimney develops the strongest draft.
Hi ,I don’t mean to sound thick, but until the draft/flow gets going in the right direction, isn’t any fire you start in the burner just going to waft straight UP into the surrounding room ?? Once again, apologies for asking a stupid question.
Hi Anthony,
That is a good observation/prediction. It isn’t a stupid question at all. In practice, I’ve found there is usually a draft even before lighting the stove since any breeze outside the house draws air out of the chimney via the venturi effect, causing a partial vacuum in the fireplace which in turn draws air through the rocket stove whenever the cover is removed from the combustion chamber. To start the stove with no smoke released into the room regardless of the presence of an outside breeze, I use a small propane torch aimed into the rocket stove for a few seconds prior to lighting the fuel (regardless of the direction of the draft the propane torch makes it much easier to light fuel that is way down at the bottom of the combustion chamber). The best evidence of the lack of combustion products released into the room is olfactory rather than visual. When I used to light fires in the fireplace, I could smell it throughout the room even if I couldn’t see any smoke. When I light a fire in the rocket stove I can’t see or smell any smoke.
You ought to switch to solid mig wire with 75/25. You will enjoy welding a whole lot more when you dont have to deal with smoke, flux, and spatter. And its cheaper in the long run.
Hi macona. Thanks for the advice. I will try it.
The non-presence of ash just means that it’s going up your chimney, because ash is made out of minerals in the wood that won’t burn. Soot on the other hand is unburned carbon, and the presence of soot in the pipes signals an incomplete burn.
It’s actually not very nice to blow the ash around the neighborhood, because it contains naturally occurring radioactive elements and heavy metals, and chemicals used to treat the wood you’re using among other things, and increases the lung cancer and asthma risk for people living in your area pretty much the same as with diesel particulate emissions, because they have to breathe the fine dust that comes out. In some studies it has been estimated to have a comparable effect to second hand smoking.
One of the downsides of rocket stoves or other high temperature fireplaces is that the very high temperature combustion also produces nitric oxide out of the nitrogen in the air. Combined with the steam present in the flue gasses, it forms nitrous acid which will slowly erode your chimney as it condenses on the surfaces.
That’s one of the reasons why you can’t cool the gasses all the way down – it has to be hot enough to keep the water as steam and pass it through the chimney. Though of course, nitrous acid also causes acid rain and nitric oxide destroys the ozone layer, which is why power plants use smokestack scrubbers to get rid of the stuff.
Your stove is somewhat similiar in idea to a downdraft wood gassifiers, which use a water bubbler and fiberglass screen of sorts as a scrubber. The idea is to combust the wood with too little air, and then burn the resulting mix of hydrogen, carbon monoxide and methane gas in a separate burner. About 20% of the heat is produced in the gassifier, and 80% is available in the woodgas, and all the ash is left in the gassifier and not blown around the neighborhood.
Hi Eikka,
You may be right about the ash. I will have to investigate further.
However, I’m doubtful that the combustion temperature in this stove is much higher than the peak combustion temperature in an ordinary fireplace or wood stove, and given its higher efficiency, I believe the NOx emissions are lower per kWh of useful heat produced. Some experimentation may be in order to determine actual combustion temperature, but I know that NOx emissions are not much of a concern below about 1500 degrees C (around the melting temperature of iron) and as the unmelted nails in my ash will attest, the combustion temperature is lower than that. Perhaps I’ll try melting copper (~1100 degrees C) too.
Incidentally, if the combustion temperature were too high, it would be a relatively simple matter to reduce it by recirculating some of the exhaust back through the combustion chamber. That would be much more efficient than the more common solution of just drawing more air through the system.
For me this project is mainly about burning a single pile of scrap wood efficiently. I’m not planning on operating the stove as a primary source of heat so I’m not too worried about condensation in the chimney. If I did want to address that problem, rather than increase the exhaust temperature to eliminate condensation, I would simply pipe the exhaust all the way outside through a PVC pipe (the melting temperature of PVC is well above the exhaust temperature of the stove and I believe it will not corrode in the presence of nitrous acid). The exhaust temperature would likely be near ambient at the exit and most of the water vapor would have condensed in the pipe and could be collected/drained. This solution would probably require addition of a small exhaust fan to increase the draft which might be hindered by the longer exhaust path.
If I piped the exhaust all the way up my chimney through a PVC pipe, then I could also draw fresh outside air directly from the fireplace for combustion making the design even more efficient compared to using inside air for combustion.
Thanks for sharing your knowledge.
My rocket stove has drawn some attention over at hackaday.com. See more comments here: http://hackaday.com/2010/10/04/wood-burning-house-heater/
CAUTION CAUTION CAUTION
Make sure the tank you use is not galvanized, galvanized tanks will give off toxic fumes when heated. Be careful with treated lumber, treated lumber contains toxic chemicals such as arsenic.
Hi Brad,
I’ve never heard of a galvanized hot water tank. I believe most are just mild steel with a glass lining. A sacrificial anode is used for rust protection rather than galvanizing the tank itself.
Your warning about burning treated lumber applies equally well to ordinary fireplaces and wood stoves (and especially open fires). I don’t burn treated lumber.
Water pre-heating and other questions
Would it be feasible to have copper lines coiled around inside there to pre-heat water going to an electric water heater? I am also wondering if such a preheater would require any modifications to the house’s water system. I would think that an inline one-way valve might be a good idea but otherwise I don’t see why it wouldn’t work.
Also, are there any minimum height requirements for this kind of stove? Does the internal chimney have to be a certain height to create an updraft, or is that mostly taken care of by the draw from the house’s chimney?
Hi MattinEugene,
Using coiled copper pipe inside the stove for water heating will work, but you should not simply hook it in line with your existing water heater. Water will need to flow continuously through the coiled copper pipe or it will simply boil in place (if you have a one way valve installed this could cause your hot water tank to explode due to the increased pressure). To avoid this problem, you would need a closed loop and a pump to circulate the water through the stove. Also, the copper pipe in the stove may be prone to corrosion over time due to acidic exhaust products.
Connecting the exhaust to the house’s chimney improves the draft, but draft is still affected by the height of the stove itself and other factors like the diameter of the internal chimney and the diameter and length of the exhaust tube. The minimum stove height for good draft will depend on those factors. Experimenting to verify sufficient draft before final construction is a good idea.
Great project! For safety, you should install a carbon monoxide alarm close by. Incomplete wood burning produces carbon monoxide and that dryer ducting looks awfully thin and easy to puncture. A leak could put CO into the room with deadly results.
Great write-up! Thanks!
I love your idea of an oxygen sensor in the exhaust pipe – it mirrors ideas I’ve had about wood stoves.
Have you considered the use of a catalytic converter as a secondary burner? You could probably find one of the correct size to simply replace most of the length of the internal chimney. If you were to do so, it might require an air-injection pipe.
Hi, inspiring project, thanks!
I’ve just tried my first rocket stove (for heating pans). Partial success.
Just a comment about Eikka’s note about the soot in your chimney:
as I understand it, there will be v little soot produced, because of the high burn temperature and therefore (more?) complete combustion of the wood. I think the soot is the unburnt particles. This is one of the reasons why environmentally, rocket stoves are a good thing – Approvecho quote very high smoke reductions in smoke from their’s for inside cooking. this means the users suffer less respiratory damage, as well as needing less wood.
The stove I just built (version 1) had an aluminium stick tray, which partially melted. As alu melts around 660C, burn must have been this temperature or more… I’ve read elsewhere that burn chambers are”around” 1000C, so maybe a bit eblow copper melting (around 1100C).
Great article!
I have been wanting to buy a propane bullet heater for my garage to work on my trucks in the winter.
This seems like a MUCH better option!
Propane is way more expensive than free wood.
And I love the 30 minute feed time, as I’ll normally only work on the trucks for a few hours.
Who knows, maybe it will heat the house up a little bit too!
Came over here from hackaday, and following up to Rob’s reply there on here because it makes more sense.
I hear where you’re coming from WRT efficiency, and there’s more to it than just combustion completeness. If you want to get into some seriously anal analysis of efficiency, I’d suggest reading Reynst’s “Pulsating Combustion”.
Anyway.
It strikes me there’s 2 areas where adding thermal mass is going to help the heating profile. The first, and most obvious, is directly after the “chimney”, where the gas is the hottest and you therefore have the highest delta between gas temperature and ambient.
The second would seem to be along the “exhaust” before you “throw it away” up the chimney. Certainly the “rocket mass heaters” I’ve found on line merely slap a load of mass around the exhaust pipe and extract / store as much heat as possible from the gases before they go outside.
Water is certainly one of the best and most easily available heat storage media, but it does bring with it certain dangers. the first is the danger of explosion, and the second is the danger of disease. I would much prefer a heating system expansion vase to a simple “open vent”, if only to avoid having constantly heated and cooled liquid open to the air. That could (and probably would) get real smelly, real quick.
Water (or other fluids) allow the addition of more thermal mass by the simple expedient of “adding a bigger storage tank”. It also allows the installation of radiators far away from the heater itself. On the other hand, it adds a whole shedload of complexity. Mind you, it could be added on as a “bolt on extra” by making a heat exchanger that fits inline to the exhaust outflow. Very easy to make, all you need is an insulated box that directs the exhaust gases through something like a car radiator.
I think for the main heater itself I’d tend to use concrete or similar. But if you’re gonna go to that much trouble and add that much weight,why not simply make the heater itself from firebrick?
I would tend to use a “T’ piece at the exit of the main “heater” as an ash trap. You’ll want to be able to clean out the bottom of the heater as well, that’s gonna accumulate ash pretty fast anywhere that exhaust velocity drops. Speaking of cleaning, I’d probably make the top removable (or at least have a removable part of the top) for decoking / desooting purposes. If you get soot buildup, there’s a danger of having a very high temperature fire feeding direct into your exhaust, with predictably bad results.
As for fans and the like, I would have thought that as long as your exhaust is hitting your actual chimney above ambient temperature, you’re gonna get draught whether you like it or not. Adding fans for anything other than “cold startup” feels like premature optimisation.
I’ve been having thoughts along the lines of a hybrid rocket / vortex chamber combustor for sawdust burning, but that’s a whole different kettle of “poisson”. Might have a play with that idea tomorrow.
Water is an excellent heat sink and one could construct a closed loop system utilizing a small expansion tank, as used in a hydronic system. It would also be a good idea to install a pressure gauge and a safety valve, all of which are not too too expensive. If you want the water to circulate, you could install a small pump (circulator).
It really is not that complicated to do this if you have any handy skills. Perhaps I should retrofit my existing hydronic heating system from gas to a rocket stove.
What is the purpose of the insulation on the chimney? Is it just to stop turbulence inside the chamber and allow best possible draft?
Hi Mark,
The short answer is that the insulation increases the natural draft. The long answer is the insulation increases the temperature difference between the hot exhaust in the chimney and the cooler exhaust outside the chimney which increases the difference in exhaust density between these two regions. You want the exhaust density inside the chimney to be low and the density outside the chimney to be high as this is what generates the draft.
My idea was to use two gas water heaters; a short fat one on the bottom welded to a tall narrow one on top. That
would give a larger combustion chamber. The top one would retain it’s insulation with more added and covered with plastic to shed rain. The whole thing was to be outside, filled w/ water/antifreeze (with pressure relief, natch)
and piped into a car or truck radiator in the mobile home on the wall under the propane wall furnace. This keeps
CO andCO2 out of the house. Since it is nearly impossible to control combustion and especially shutdown, a sys-tem of draft/temp. control would be mandatory. I never heard of the rocket stove idea before today, but that added would surely improve and even simplify the whole deal. Thanks, Don
Great job and a very inspiring project. I’ve been toying with trying something like this for years. I’ve read on the Approvecho site that the primary reason for insulating the combustion chamber and internal chimney is to insure that the rocket stove’s fire temperature stays high enough to completely burn up all of the carbon material prior to being exhausted into the heat exchange area. Early wood burning water boiler systems often robbed too much heat from their fires early in the combustion process which resulted in an inefficient smoldering and smoky fire with too little heat. Your insulated internal chimney keeps the fire gases super hot so that everything burns up clean and with virtually no smoke. Thanks again…I smell sawdust burning…I must be thinking too hard!
HI Rob. I liked your blog. I’m familiar with rocket stove mass heaters but I’d love your opinion on retrofitting. I’m living in an old house on the 2nd floor. I was wondering if a regular floor would be strong enough to support the weight of a mass heater, or if you really just did a basic rocket stove without surrounding it in tons of clay etc. I have some more questions, and I’ve love to discuss this by email.
Thank for your great entry.
hi
Thanks for very informative write up – (and easy non defensive dealing with all-comers comments is a joy to read!)
My question have some bits the same as the last here: wooden floor, but single storey, no exisiting chimney…
So- I’m thinking: large hearth stone to insulate the stove itself enough?
Or probably will go for air flow underneath, too for extra safety, i.e. make little legs
Stand it well into the room, at least 18″?
These 2 may cope with the safety but how to get a portable- i.e. temporary thermal mass??
I’m hoping I can get some firebricks from old storage heaters and just stack them round the tank/barrel and build a tunnel for the exhaust out of them, adding more if they still get too hot – is it really that simple??
-since exhaust pipes are round and bricks square, I wonder if theres any conductive infilling I should use for maximum heat exchange??
Chimney – I’m assuming I can just make a hole in the wall and stick my now cool pipe thru – I was really disappointed to realise yours went up a chimney – from the picture I thought it was just stuck out of a window, which was what I want to see done.
So any feedback or advice much appreciated – all the ebst for your burnings!
Rosie
The issue as I understand it with the chimney \ exhaust is that it is doubtful that most localities have any knowledge about rocket mass heaters, so there is likely no code for them. As near as I can tell the exhaust is not hot enough to burn anything. I can hold paper over my internal smoke stack and it doesn’t burn. I’m going with galvanized 4″ pipe for the exhaust. It’s cheap, quick, and easy. Make sure you have adequate clean outs so that you can keep it clean and creosote free.
You might wanna read the book “Rocket Mass Heaters: Super Efficient Wood Stoves You Can Build” by Ianto Evans and Leslie Jackson. http://www.rocketstoves.com There is a section in the book about chimneys etc. It’s a good read!
Cheers!
Alternate materials for internal smoke stack insulation…
I used a welding blanket that is tested up to 1100 degrees… wrapped it in foil tape.
You can also use a thin wall pipe & tape, and fill with perlite.
Cool project!
You’ve taken parts of the Approvecho Rocket cookstove, and sort of added a part from the Cob Cottage Rocket Mass Heater. (see Brent’s reference to RocketStoves.com)
And you’ve gotten the thing to work at about a 4″ diameter, which may be a first in my experience.
I notice a few things that might be safety concerns (and I’ll rebut some other concerns, too):
– Exhausting from a small appliance to a big chimney, you probably don’t have enough heat to push the exhaust out the chimney under all conditions, so your fireplace may be leaking CO and smoke back into the house under certain conditions. CO detector good.
– Aluminum exhaust pipe and foil wrappers on your junctions may not be suitable for high temperatures – check this joint periodically to avoid smoke leaking into your (already leaky) radiant heat container.
– Galvanized metal can handle temperatures up to about 700-800 degrees F, so I think you’d be OK even if your water heater had a galvanized exterior. I would _not_ use a galvanized barrel on a Rocket Mass Heater.
– Rocket stoves and heaters do produce very little volume of ash (ours traps ash further on in the exhaust ducting, too, so it’s demonstrably not flying out the chimney). I think the difference is due to complete combustion of the wood’s fuels. Incomplete combustion yields a lot more soot and charcoal, components that bulk up most woodstove ash.
This ash is the natural minerals in the wood, and nothing you do in a woodstove is going to change the level of radioactivity or heavy metals present in your local wood/ash. It will concentrate the minerals and alkaline ions, so if your firewood comes from off-site it might pay to dispose of the ashes off-site as well. Complete combustion is _much_ kinder to asthmatic neighbors than woodsmoke and particulate emissions.
Rosie, and other interested in discussing related projects, consider stopping by the alternative energy forums at http://www.permies.com. Similar projects are posted there a lot, and people chime in with advice and how-to pictures.
p.s. I like your fuel-door screen a lot. And nice paint job.
Hi Erica,
Thanks for your input/expertise and for your great work promoting rocket stoves. Your website http://www.ernieanderica.info/ is excellent, especially all your photo albums.
-Before building, I was also worried about not having enough heat to push the exhaust up the chimney. There seems to be just barely enough when first firing up the stove. I can see the smoke building up inside the fireplace, but the fireplace is quite well sealed and I have a CO detector right next to it that has never registered anything. After the stove has been running a few minutes and the exhaust temperature has increased it seems like the exhaust in the chimney is warm enough to rise on its own and develops better draft in the rocket stove than if the chimney was not present. I know this is the case because if I open the fireplace door the rocket stove burns less vigorously rather than more vigorously.
-I haven’t had any problems with exhaust leaks. Once the stove is running a few minutes, for reasons indicated above the internal pressure everywhere in the system is lower than that in the house, so any leaks draw air in instead of leaking exhaust out.
– One problem I have experienced is the gradual decay of the aluminum pipe (I assume due to condensation of nitrous acid from the exhaust). The original pipe lasted about a year before I discovered several small holes starting to form. Even then there was no noticeable smoke or measurable CO leaking into the home. This was never intended for permanent installation (only a temporary means to efficiently dispose of scrap wood) so I am not upset with the performance.
– Thanks for weighing in on the topic of ash. My stove produces very little, but I haven’t measured what’s actually going up the chimney. I’m glad to know your experience confirms my belief that complete combustion produces less ash (or rather it produces ash with a lower concentration of unburned or partially burned wood).
Thank you Rob, for that nice and comprehensible description.
I wonder if it is possible to combine the rocket oven principle with existing oven designs, especially those which are supposed to store heat by themself.
Some (as one of mine) are made of stone (fireclay inside, a kind of ceramic outside), are heated by wood. The fireclay and ceramic structure stores the heat and radiates it slowly into the room. (You probably know that quite well, but I am not sure how common these kind of ovens are outside Europe (I assume you live in the US)).
When I saw the configuration, which you used to “test” the draft, I began to think about, what woould happen if one leads the exhaust gases through the door of such an heat-storing-kind of an oven permanently.
This could be done in two configurations, I think:
The first configuration would be literally that shown here: http://www.iwilltry.org/b/wp-content/uploads/2010/03/rocket-stove-testing-draft.jpg where the exhaust gases are leaded through a heat-storing-kind of an oven (for which the door must be replaced by a metall one with a hole).
The second thinkable configuration could be described as if the water tank is replaced by the oven body. Thus, the isolated part of the chimney (immediately following the combustion area) would be located inside the oven. The exhaust gases would go into the interior of the oven and then through the chimney of the oven. Eventually one would have to direct the hot gases away from the ovens exit to its chimney to allow them the heat the stones first.
Would you think that this would work? What happened during your test?
I am not sure if this ist just crap or a good idea. I came over that issue first from the hackaday site a couple of weeks before and thinking about reducing heating costs.
I’m not entirely sure of the configuration of the kind of oven you’re talking about but the idea sounds like it would work. Effectively you just need to offer some place for the heat to go before you send the exhaust out of your home. In my test without the hot water tank shell the burn was just as good as with the hot water tank shell. The only difference is that I wasn’t capturing as much of the heat.
Hey Rob! Question for you… How much clearance from top of your internal smoke stack to top of tank?
I’ve moved my unit inside and have been doing some test burns with good results so far. 🙂 Will send over some pictures soon.
Cheers!
Brent
I used a chunk of 2×4 to set the clearance during welding, so my clearance was around 1.5″. All that is required though is that the area of the clearance (pi*diameter*clearance) is the same or greater than the area of the internal smoke stack (pi/4*diameter^2) so that you don’t have a restriction. If you do the math, that means the clearance needs to be greater than or equal to 1/4 of the internal diameter… so with my 3″ smoke stack I could have gotten away with about 3/4″. Good luck.
Yours is an interesting project, and I admire your welding skills.
I came across your site whilst researching wood-burning stoves. My ancestor now has (a commercial) one and is happy.
I am posting here because there is possibly of something you have not taken into account, and I do not wish to see you harmed.
As I understand it, the fire temperature is high (maybe 1000F ?) the chimney hose is at 60F (much cooler).
Tars and oils that are volatile at 1000F will condense at lower temperatures, and may have been coating the inside of your recycled hot water tank. These residues will probably pool at the bottom of the tank. They will probably be smelly, viscous and highly flammable. Given the right conditions, they will ignite and burn very fiercely.
I know you live in the USA, it is winter, and you probably do not want to hear this right now, but I think you should disassemble your stove and take a look to check for flammable condensates.
Whilst the system is sealed, and the flammable condensates are deprived of oxygen ( fresh air ), all will probably be well, but should acids in the smoke (this is likely) eat a hole into the copper tank, then the temperature and availability of oxygen could lead to a serious fire or explosion.
I would just like you to stay safe, and check your fire exits.
Best wishes.
Mike.
Hi Mike,
Thanks for your concern. I designed the stove to be relatively easy to take apart (just grind off a few tack welds) precisely so I could check for buildup on the inside. I have had it apart already (after last winter) and there was no significant buildup of anything flammable. There is just a light coating of soot and some ash. I tried burning it with a propane torch and it would not ignite so I am not too worried.
Question
Does this stove produce any ash. I am sure it makes some even trains had spark arrestors. But do you have to clean ash out are don’t you, I see no ash clean outs in the pictures.
Second a suggestion why not get a couple of those small garbage cans about 15 gallon pass that flexible tubing through them 2 or 3 turns put sand in the cans as a thermal mass and pass you exhaust through them. Move the cans out as necessary after season with a hand dolly. I don’t guess they would hold temp all night but maybe for a few hours.
Thanks for the pictures and text
A couple things…
Over the weekend I added a 4 inch fan onto the end of my duct work. (My “chimney” was drawing poorly. Might upgrade to 6″ duct work.) Let me just say that this fan boosted the performance of the stove by a huge margin. It literally turned my rocket stove into a snarling beast that devours just about anything I throw at it. For the sake of permanence I will probably improve my chimney and try to get some better natural draw going.
Ash is very minimal. I use a small bowl to gather the ashes after a few burns. 🙂
I like this thing so much I am actually considering installing it in my den or perhaps in my breakfast nook. Might dress it up with some copper flashing and make it look like something fancy.
Cheers!
Hi Sidney,
The stove does produce ash, but much less than a typical wood stove or fire place. There is a cleanout but it is not visible in the photos. The steel plate that is the bottom of the combustion chamber is removable. It simply slides out and the ash falls into a bucket placed beneath it. Actually, since a few people have asked, I just added a photo of the cleanout and updated a couple other pictures.
Regarding your suggestion about the garbage cans and sand. While I agree that would work, I’m not very keen to look at a couple garbage cans. The hot water tank shell is already pushing the limits of aesthetics, though it does have a bit of a neat steam punk kind of look to it ;-).
I also added some more info on thermal mass to the article. Basically it’s not really that useful when the stove is being used only as supplemental heat and your primary heating system is on a thermostat.
Hi Brent,
Glad to hear of your continued adventures ;-). I played with a little 12V computer fan on the end of my exhaust tube and it had a similar effect (ie I had to load my combustion chamber every 10 minutes instead of every 30). Basically it turns the stove into a forge.
Keep in mind though that the snarling beast is likely running hot and lean which, while spectacular, isn’t very efficient. Better to draw only as much air (and heat) out of your home as what’s needed to support complete combustion.
Here’s a link to some pics and a vid of my project. Its been fun!
http://streetjesus.blogspot.com/2010/12/rocket-mass-heater-project.html
Another upgrade… I made a small limiter plate that I put on top of the feed tube to restrict the air flow. So now I get the best of both worlds… good draft and complete burns. 🙂 Works like a champ. With the fan installed temps do see to go up a little, but nothing too alarming. My exhaust is just a 4 inch steel pipe going out the wall with an upward 90 elbow, a 5′ foot straight pipe, and another 90 elbow that directs the smoke away from the house… The fan is on the end of the exhaust blowing out. I like this setup because there is never any smoke or gas leaking into the house.
The other night I burned up a few pallets and a ton of junk mail. It leaves behind very little ash. I made myself a little “hoe” so that I can scoop the ashes out of the burn tube.
I’m thinking about maybe running a loop of additional exhaust tubing inside to more efficiently draw heat from the unit.
Cheers!
Brent
You can improve the efficiency of this remarkably by adding a 3rd chamber.
1st chamber is the chimney,
2nd is the heat chamber as you have it now
3rd chamber would be around the 2nd and would have an open top the same size as the chimney’s diameter (best to exactly the same, and the bottom would not be sealed.
inside the 2nd chamber you could weld some fins on the inside wall to collect more of the heat into the walls of the 2nd chamber and then weld fins to the outside wall of the 2nd chamber to aid in dissipation. The 3rd chambers responsibility is to force air to enter at the bottom of the chamber, pass through the airspace between the 2nd and 3rd chamber (and over the added radiant fins) and then out the chimney sized hole at the top.
The heat from the 2nd chambers walls and added fins will heat the air in the airspace and convection will suck the hot air out. The point of having the hole at the top be the same size as the chimney is that if it were smaller it would restrict airflow and if it was larger it would not output air at speed, the smaller whole makes the air move faster.
Alternatively/additionally, you could put a blower at the top and blow the air into a nearby heating vent for home distribution.
I have made a smaller unit with 3 diameters of steel pipe and 1x 16 gauge sheet sliced up for the fins for heating a cabin. My unit is 4ft tall with the upper chimney, 2ft without it. used a air ducting reducer from the outside chamber down to the size of the inner tube. At the top of the air duct I have a elbow to push the air sideways instead of up to the ceiling. There is no electricity at the cabin so to powered fans, have to use the heat to move the air.
My unit runs on any dry organics. That means dry pine needles, wood chips, paper, cardboard. The denser the material the better though as a handful of pine needs and a pine cone burns out in just a few minutes while a 3″x6″ log lasts 20 or more. the better the fuel the less ash also.
You can hear when you need to add fuel. When the unit is burning hot it makes a obvious but not obnoxious air moving sound, about the same volume as a typical computer’s fans or so, and as it dies off, add fuel.
Dan- I am having a hard time visualizing the 3 chamber system… Are there pictures anywhere?
Hi Dan,
I believe you’re essentially describing adding a shell around the existing rocket stove with openings at the top and bottom for air from the room to pass through. I’m doubtful whether this would improve efficiency in my case. It would mainly have the effect of transfering more heat by convection and less by radiation.
All other things being equal (ie same completeness of combustion, and same air consumption), relative efficiency depends only on exhaust temperature. I can get a significant reduction in exhaust temperature (indicating higher efficiency) for less effort simply by adding more length to the exhaust tube. As mentioned in the article, my quick tests showed a temperature drop half way to ambient for every 20cm of exhaust tube.
The exhaust temperature entering my fireplace is currently about 60 degrees C with ambient around 20 degrees C. So another 20cm of exhaust tube would drop the temperature to about 40 degrees C. Another 40cm of exhaust tube would drop the temperature to about 30 degrees C, etc. Why haven’t I done this? Two reasons: 1. I can’t figure out how to make it look nice, and 2. Most of the heat that is still in the exhaust as it enters the fireplace will be absorbed by the walls of the fireplace and chimney and released back into my home over time anyway (think of the fireplace as my thermal mass), so I suspect there is not much to be gained.
I’ve been meaning climb up on the roof and drop a thermometer down the chimney while the stove is running to see how the exhaust temperature varies, but I have yet to do so.
The engineer in me has already (it was late and I should have been sleeping) modified this design.
I can send the drawing, and anyone who wants to may make additional modifications to the design.
It still uses the same water tank, but the fuel and air feed have been changed.
My only experience with rocket stoves is from this site and a few others. So, without ever having seen one I was wondering if you think an automatic pellet feeder would work to keep the stove running for longer burns?
Great Job Rob,
I’m going to try to build something very similar to what you did but I was thinking to insert some fire-bricks inside the J-shaped tube. I am a little bit concerned with combustion into J-shaped tube as I think that it will be affected by corrosion. did you deal with that?
Regards
Hi Daniele,
I did not take any particular measures to deal with corrosion. I’m doubtful it would affect the useful lifetime of my stove since I only use it for burning scrap wood from my projects. Perhaps the rate of corrosion is twice what it might be if I lined the walls with fire brick, but at the rate I use the stove, that may mean a lifetime of 20 years instead of 40. I can live with that.
Rob
Hi Steve,
I’m not very familiar with automatic pellet feeders but I can see no reason why such a setup wouldn’t work. My only interest is in burning free scrap wood from my projects.
Thanks Rob,
another reason to put bricks in that zone could be to increase and stabilize the burning temp. what do you think?
Moreover, maybe it is possible to use only castable cement instead of brick as they do when making little homemade kilns, isn’t it?
Regards
Found a supplier for the rock wool, also called Mineral wool, slag wool,
http://www.atsacoustics.com/item–Roxul-Acoustical-Fire-Batts-Mineral-Wool-2-inch-Case-of-6–1006.html
Temp gauge
http://www.vogelzang.com/browse.cfm/temperature-gauge/4,52.html
I’ve been putting this project off for too long now!
This is an excellent, simplistic build method for this heater. Probably the most simplistic I’ve ever come across. And I own several of Ianto’s books. Including his work on the Rocket Stove. But I beleive this was the boost I’ve been needing to get started finaly.
One thing I would recomend however, for any builders of this particular stove, would be to read over Ianto’s notes on measurement variables for the interior chimney gap at the shroud & the lenghth’s for the horizontal fire tube sections.
Excellent, well done job & very inspirational!
I used School bus exhaust pipe 4 inch, Bus companies throw away large sections which for the most part is like new and its already made for the heat. I’m putting a 6 inch section at the top and setting it up with bolt stock and bolt going through one of the openings at the top of the tank into a welded nut over the hole and welded a small tube on the six inch piece and a round washer on the bolt stock top of the tube and below the tube to allow me to raise or lower the six inch piece. At the top of the tank so i can do fine adjustment of stack height with the temp gauge in place. Also 4.5 inch stainless steel hose clamps over the aluminum tape to help hold the insulation in place. The insulation I ordered on the above link is two inches thick and it appears it is layered so you could separate it to perhaps to one inch pieces. When using the aluminum tape in the past for the sealing of pipes for a regular wood stove I found the adhesive that holds it tight when you are putting it on goes away after you have fired your stove and to a degree loosens up. Using the hose clamps or stainless steel wire wrapped around the outside of the inner tube helping hold the insulation on might make it more maintenance free. stainless holds up to, (2750 deg F). I should be done with mine next week and hope to put it on youtube. I hadn’t thought about horizontal fire tube section as mention above.
I finished my Rocket stove burner today and tried it in the back yard.Amazing heat from it and no smoke!
4x4x 15″ steel vertical feed tube 4″ round steel firebox 15″ long and 4×4 steel chimney 4′ long.
Now I have to put it into a tank of some sort.
Fun project!
you can put another barrel in series with tight sealing temperature to accumulate and fill it with rocks and sand.
Congratulations – and again – congrats – on a great bit of DIY. It is just terrific to come across this sort of inventiveness. There are some BIG changes coming – financial instability and oil prices etc etc. and it is people who think and work like this will best cope with the crunch. Keep it up!!
Wow, what a great rocket stove! I have been working on a rocket wood stove along the same lines using a 16 gal steel grease barrel. I am presently using galvanized 4″ pipe for my combustion chamber and riser tube, but a wielded 4″ round steel assembly is in the works. Please see blog posting http://www.permies.com/permaculture-forums/8903_0/alternative-energy/rocket-wood-stove also see blog posting http://tinyhouseblog.com/stick-built/hermit-deluxe-news-years-update/ Please keep up the good work!
I was thinking about your statements of heat transfer using a heat exchanger such as water to release heat over a period of time after the fire has gone out.
What about installing a wire mesh wall that would be like a sleeve on the inside of the tank and then fill the sleeve with river rock something like river rock that would retain heat and release it over time after the fire has gone out.
My concern would be any rock over heating and exploding, what are your thoughts on this?
By the way great job on your heater as well explaining the step by step process with good photos.
I am building a much small version out of a propane tank for my RV.
As well I am wondering if there is a material that would retain heat that would as well be lighter than river rock.
Basically when I speak about a sleeve, I am saying build a second wall that runs the entire length of the inside of the tank, you could still have your burn tub as well exhaust tube run through the second wall.
The empty space between the walls could be filled with something that retains heat, water I would think would be dangerous.
@Dale, try vermiculite.
Hi Rob,
Your rocket stove looks great. The idea of using a water tank is fantastic and guess what.. I had to change my old one this summer. My rocket stove is almost done. Please visit my facebook page and leave comments….
http://www.facebook.com/pages/Dans-la-shop/161647227253672
I guess I was not clear on what I was saying, I was thinking that if you put in a second wall and filled it with something that would retain the heat and then release it over time once the coals went out.
This way you should wake up to a fairly warm room and not have to start a fire in a cold room that would take much more time again to bring back up the temp.
Vermiculite would be great to focus the heat, but not retain and transfer over time.
Thank for your thoughts Penny Pincher
I am currently building a mini version of what Rob has made, I plan on putting in an ash shaker which will fall into an empty chamber below the burn space, this should allow me to clean out ashes even if the fire is still burning.
As well I have looked at other rocket heater designs that have a lid they can close over where the wood goes and has an air chamber right along side of it that drafts down and under the wood, this way you can have a closed door over the wood.
It would be very difficult for any stray sparks to come out the air feed chamber.
I like the burn chamber design in the stove this fella has produced, as well the fella out of Oregon who is credited for the rocket stove design as well uses this same design in a horizontal position.
http://www.goodweld.co.uk/id36.html
Here is a better view of what I am talking about having a secondary chamber as the air feed which is separated from the wood feed chamber, this will enable one to install a door which can close over the top of the wood.
The air feed would be able to fuel the fire unobstructed and give you greater control over any sparks that would like to jump out of the fire.
http://www.goodweld.co.uk/imagelib/sitebuilder/misc/show_image.html?linkedwidth=actual&linkpath=http://members.tripod.com/gabriel_apostol/sitebuildercontent/sitebuilderpictures/apostol_rocket_stove.jpg&target=tlx_new&title=Apostol%20Rocket%20Stove
Hey Rob I am near completion of my much smaller down sized version for my motor home, I have done a few test burns and have found that as the wood burns some of the ash likes to fall in towards the smoke chamber.
So I have done a little redesigning of the burn chamber, lowered the grate where the wood burns to a lower spot than where the smoke exits, as well have made the ash door large enough to clean out the smoke chamber just in case.
Just wanted to ask if you have faced this problem with the ash.
I realized that if I used it like I originally had it, the ash would eventually constrict the air flow in the smoke chamber.
Will be doing another test burn tomorrow, planning on posting youtube on the process of building it when I have it complete.
Just wanted to thank you and Brent for the inspiration and sharing, I have been researching for about a year before making the decision to take the plunge.
Well here is a video of my completed mini version of what you built Rob with a twist.
I cut apart a small propane tank as well cut the rounded top off and cut out the bottom of a stainless steel frying pan to weld in on top so I can have a cook surface.
Again thank you for the inspiration.
http://youtu.be/sJOVG71YiJI
Hi Dale,
That’s a nice piece of work. I did find the same problem with the ash in my design but I found I could clean it out well enough through the bottom of the burn chamber. It’s not ideal but it works. I’ve been considering adding a sweeper plate on the end of a rod that reaches into the tube through a hole drilled in the side of the burn chamber. In operation the rod would be pushed all the way in and would not obstruct the exhaust flow significantly. To clean out the ash you remove the bottom clean out panel and pull the rod out, which sweeps the ash out of the horizontal tube where it simply falls out the bottom of the burn chamber into a bucket or whatever you use to collect the ash. Good luck with your design, and let us know how it works out.
Great idea on the ash cleaning rod Rob, I have found when starting the fire outside for my test burns it is very difficult to get the draft going.
I have found if I close the top lid and start the fire with the ash door open it helps to get it going quite well.
I then shut the ash door and open the top lid at the same time and the draft picks up well, problem is a lot of smoke develops and escapes the burn chamber and does not immediately go up the chimney.
I am thinking of adding a second tube to the chimney at a steep angle downwards with a sliding trap door so I can take an ordinary hair blow dryer shove it in the end open the trap door and start my own draft for lighting the stove.
This is going in our RV in which we are living in full time and smoke would be a real bummer.
I am building chimney cap that will not allow any back drafts in high winds which we do get here in the winter time.
Last winter we had ice forming on the insides of the metal frames of our windows!
I am setting up the chimney pipe in three sections and will use high temp silicone to seal each joint that will allow for easy assembly and as well dis-assembly so I can use it in the summer time as an emergency cook stove if needed.
I was able to get a good boil going on a full tea kettle with it.
I used high temp putty glaze to seal the two half’s after tack welding in a few spots, it worked well.
Have to tell you I must have spent six months searching rocket stove heaters before I found yours and knew that was it.
Thanks for sharing, I am already getting interested folks on youtube that are looking at doing the same.
See what happens when you have a great idea?:>)
By the way as a boy I lived in Newfoundland.
My mother is Canadian
Keep the great ideas coming.
Cheers
Well Rob sitting here on a nippy cold night enjoying my rocket stove heater.
It works so well that I am going to have to make some changes so I can control the draft and the burn.
Got up to 90 degrees, a bit to warm for my comfort.
Still too hot is much better than too cold.
Works pretty sweet, not a whiff of smoke, as you said using your fireplace you could smell smoke and I can remember the same thing and it is not the case with the rocket stove heater.
Again thank you for the inspiration and as well posting great picks.
Which insulation material gives the hottest combustion temperature in the combustion tube? Vermiculite? Is it better if I make the combustion chamber taller….say1.5. 55gallon drums high rather than just 1. Still retaining the 1.5 inch clearance between the top of combustion tube and 55gallon drum? Is ceramic wrap hotter than vermiculite for combustion tube? Can I taper the combustion tube from 8 or6 inches at bottom to 6 or4 inches at top to increase velocity and temp. Similar to an Irish camping coffee pot which burns everything and anything…very well? Is the 1.5 inch combustion gap etched in stone or is it slightly variable? Hot hot can i possibly make this rocket stove ? Many thang,john
Sorry I’ve neglected the site for the past couple months. I’m excited to see all this interest in rocket stoves… I guess it must be winter 😉
@ John h
I can’t comment on different insulation materials… I don’t know. Having a longer combustion tube will increase the convection force but also adds drag. There may be a length beyond which you get diminishing returns, but generally longer is better. Tapering the combustion tube may or may not help… not sure. The 1.5 inch gap is not etched in stone by any means. Essentially, you want the gap*circumference to be greater than the cross-section of the tube so that it does not restrict the flow. Gap*circumference is gap*pi*D and tube cross-section is pi*D*D/4. To find the minimum gap, just set those equal to each other and solving for the gap. This gives gap = D/4. So as long as the gap is greater than 1/4 of the tube diameter you should be fine. If you use a 6 inch diameter tube, then the gap should be at least 1.5 inches. If you use an 8 inch diameter tube then the gap should be at least 2 inches. You can make the gap bigger than that, but it reduces the length of the tube which in turn reduces the draft.
@Dale
Wow… nice stove and you tube video. Glad to have inspired you 😉 .
@cheryl
I suggest looking at Dale’s videos. You can see the modifications he made to his RV which would be similar to what you’d need to do in a mobile home.
@ Willbe
When sizing all parts of the stove the important thing to consider is the cross-sectional area at all points in the exhaust path. You want the area at all points to be greater than the cross-sectional area inside the central chimney (which is effectively your convection pump that forces the exhaust through all other parts of the system). Say your chimney diameter is A, your insulation diameter is B, and your radiating surface diameter is C. The area of the chimney is pi*A*A/4. The area between radiating surface and insulation is pi*C*C/4 – pi*B*B/4. Setting those two areas equal to each other and solving for C gives C = sqrt (A*A + B*B). So suppose A is 4 inches and B is 6 inches. Then C should be at least sqrt(4*4 + 6*6) = 7.2 inches. That would give a 0.6″ gap between insulation and radiating surface. It doesn’t take much at that large a diameter. While that would be sufficient to generate draft, you probably want a larger diameter than that because you will get more effective heat transfer with a larger radiating surface.
I’m not sure how well this would work as a sauna stove, but you are correct that the top gets the hottest (other than the actual combustion chamber).
@Andy
Nice looking stove. It’s really interesting to see all the different sorts of materials people are repurposing. You are more than welcome to link here.
Hi Rob here is a video update on the rocket stove based upon your build that is now installed and being enjoyed by me and my wife.
http://youtu.be/GSsJZ3ru0ME
I live in a mobile home, is there any way I could use one of these? If so what changes would I need to make to my home?
Absolutely brilliant design, I’ve been giving thought of making one of these for heating my apartment and my initial plan was to use an updraft design with an uninsulated chimney running inside some kind of cavity thru which I could run air at a high volume flow, however your design does away with the fan and allows for natural convection. Very nice!
Good stove Q and A. I was wondering if you have any thoughts on the size ratios of the chimney and radiating surface (or tank interior as it were)? So If I were to use a 4 inch chimney and surround it with “X” inches of insulation it should be inside a “tank” of what diameter? I see where you said you are having a good draft even before lighting the stove, would then, you be pinching down that draft if the tank was to small an internal area around the chimney? I ask this especially in the case of a lit and fully burning stove.
Willbe
So… I’m thinking about using a rocket stove as a sauna stove any thoughts about that? I would, of course, be placing rocks on top of the rocket stove which reportedly is th hottest part. Correct?
Willbe
Just like to thank you Rob and all the responders on your blog. I built a small version of your rocket heater for my workshop thats only 16’x8′ I have access to plenty of small pieces of timber and the heater works better than I could have ever imagined!.
A couple of days after installation I made a couple of Youtube video’s of the heater in action.
http://youtu.be/UBWSNjvO4cc Part 1
http://youtu.be/PtnuI4p_sUE Part 2
Thanks again for the inspiration to build it!!
Andy
Wow… It is so cool to see so many people having interest in Rocket Stoves. Rob you have started a real rocket stove revolution here!
My rocket stove is now being used as an outdoor patio heater. The room I had installed it in has children in it now and I thought it best to move it outside. I am seriously considering building a sauna out of earthbags or cob and using my rocket stove as the heat source. 🙂 I’m thinking a rocket stove would make an awesome sauna heater.
This year I took on another project and installed a wood stove in my den. You just can’t beat wood heat! In these hard economic times I believe we will see more and more people re-learning the old ways and doing more with less. Wishing well to all of you!
Cheers!
Hope you don’t mind but i’ve put a link to this blog on my youtube videos due to the number of people interested in rocket stove heaters. I find it’s a lot easier to explain how they work if they come over hear and read all the comments and look at the sketches of the heater.
Andy
Hi Rob, after about three months of use I have found a couple of design flaws in my stove set up, for one where I placed the exit of the chimney at the bottom of the stove, I should have set it up much higher in hindsight.
I tried burning three of those presto logs in the stove and they are great and long burn times, however as they fluffed up and some of the ash got caught in the draft they all piled up in the corner of the ninety degree elbow.
I had to cut out an access door as a quick fix so I can clean that area, will be doing another build this summer and feel I can cut my tank down in size quite a bit and still get as much heat out of it as I am now.
Will be moving my chimney up a good twelve inches, as well make an access door to get to the inside of the propane tank for ash cleaning in there as well.
A fellow youtuber had suggested this.
Want to also look at changing the burn box to use as it is shown now, but also as a pellet stove, and as well to be able to load it up at night before going to bed as you would a normal wood stove.
The wind chimney cap works like a dream in high winds, thank you so much for posting your stove I just knew that was it when I found you after searching for almost a good year.
I did try to give you credit in my post on youtube, and provide a link in my description but they would not allow it, so I got around that buy spacing out your site by saying a thanks to you at I will try . org and let everyone know to not uses spaces when typing in the web address.
Open source is the new wave we are all enjoying and riding.
Again, thanks so much Rob, typing from my nice and warm 35 foot Rv, it would have been so miserable this year if I had not gotten this built and installed, will be researching on incorporating a way to use it as a gravity fed pellet stove.
Hey Rob I did finally figure out how to post a link to your blog on my youtube videos, want folks to know where this great idea came from.
@Dale, thanks. I appreciate it.
This is an update to my burn times, with dry alder I was getting about ten to fifteen minutes with a wide open burn, since I installed my flue damper, and as well by placing a steel plate up top and adjusting the air flow at the top of the feed tube, along with adjusting my flue damper I was able to get a 37 minute burn time for my first test run with the same wood. I use 3/4″ round sticks about 8″ long. It is 36 degrees out side and 79.5 degrees inside. This is very exciting!
Hello Rob,
I am a Welder Fab guy and when I saw this I was hooked. I wanted a wood stove and didn’t want to pay for all the pipe and drilling the hole in the wall etc… I have my old hot water tank and I am about to begin! I had a few thoughts and wanted to pass them by you. I am not an expert on the mechanics of gas flow but know some on air flow restriction. So my question / Idea if I can explain it is the bottom of the tank has a dome pressed plate. My thought was if I cut a 3″ hole in the center and weld it to the top of the exhaust pipe leaving a 2″ gap all the way around the top between the top edge of the upside down dome and the top inside of the tank, would it help keep more heat and longer combustion burn? My thought would be it would kill the draft you need. I was just thinking of how to keep the top of the tank hot longer for more efficiency. Nice job Sir!
If you could email me your thoughts I would thank you much!
Nathan
Rob thought you and your readers may be interested in this rocket stove hot water heater design, it uses the rocket stove heater principle, simply amazing water heater, I am convinced I can use this hot water heater design to heat our water for our RV.
http://youtu.be/cy9Zlg4B0xQ
Hey Rob You still alive? I hope the tank didn’t blow!
Hi Nathan,
I’m still here… but not sure I entirely understand your question/idea. In any case I don’t think I would have any particular advice. It’s always difficult to predict how geometry changes may affect fluid flow. Experimentation trumps theory. I can say that “prolonging the burn time” and “keeping more heat” (ie increasing efficiency) do not go hand in hand. A given pile of wood (with a certain surface area expose to air) has an optimum burn rate. If you decrease the rate, by reducing the draft, your wood may last longer but you’ll be running an inefficient rich mixture and your exhaust will contain unburned fuel (ash and wood gas). It’s analogous to adjusting air/fuel mixture for an engine or oxy/accetylene mix for a torch except you only have control over the air… the amount and surface area of fuel is fixed. It’s generally much more efficient to burn hot and fast for short periods than to burn cold and slow for long periods. It is possible to have too much draft as well, decreasing efficiency by expelling more air from your home than necessary to support combustion. While that’s common for open fireplaces, it’s rare for a wood stove.
Hello Rob,
I’m curious. I dont know where everyone lives but what does your house insurance company say about having these in your house for heaitng? Do they consider them like woodstoves or it’s like dont ask to tell thing?
If you wanted to make one for a sauna say a 8x8x8 size room as and example.
Most Saunas you need at least 150F to 180F or 65c to 82c to get a good sweat going
To get ithis high of temp would you have to make size changes in the internal combustion chamber as well as the Feed Tube size or just change the size of the feed tube to handle more wood?
Thank You
Delta
Hi Delta,
Re insurance: I doubt any insurance company would consider a policy covering the use of a home built wood stove of any kind. So it’s either don’t ask don’t tell, or don’t insure in the first place. I believe it is a poor decision to insure anything you can afford to lose (on average it will cost you less if you just be careful and take your chances). I can afford to lose my home, and I’m willing to live with the risk. I also never leave my stove unattended.
Re heating a sauna: I think a stove this size would probably heat the sauna you described reasonably well, but it might take a long time to warm up. Perhaps increase all tubing by 25-50% (say 6″ in place of 4″ and 4″ in place of 3″) for faster heating.
rob like your rocket stove made my first yesterday it work buy i think the burn chamber is to big i just used what i had in my shop one pcs 6i n stove pipe one 55 gallon drum and a square steal drawer i put a steal plate over open top cut the 6 in hole left the front open to load wood put a steal grate 1 in off the bottom cut a 4in exhaust it was just a test my next well be out of a 100 lb propane tank
Rob, Are you the same fellow who wished to build a wood stove for an RV? Do you have a hard copy of plans for your creation and would you accept a donation for same if no rules of are violated? I attempted a download from Apostol Engineering and all I ever received was a message that a download was in progress. After making coffee and watching “Sink the Bismark!” on dvd with nothing coming in I gave up.
Hi Rob, I have designed a new rocket stove that will have an oven, as well should be able to get much longer burn times by using a secondary burn by adding oxygen in the secondary burn area, I am thinking I can turn the oxygen feed for the fire down and still burn up most if not all the smoke with a secondary air source where the smoke will move to just above the oven space.
This is a very rough draft, I still need to add clean out doors, handles etc.
The video shows the path of the smoke and heat.
There will be a glass window just above the oven so you can view the secondary burn.
Just as you did, I will make my plans open source.
Now look what you have started:>) This stove will be about 21″ long, by 24″ tall and 16″ deep.
The firebox will be 6″X6″ by 16″ deep.
Any thought or suggestions I am open, I now realize I should have used a 4″ chimney on my current build, it works very well but would have been much better with a 4″ chimney.
I have to clean it out about twice a month to keep a good strong draft going.
Here is the video of my next build.
Take care man and keep the great ideas coming ok.
http://youtu.be/0vI_y3_BdDE
Len , I am the fella that scaled down Robs design and installed it in my Rv, have been using it for a good solid three months now, heats my entire 35 foot Rv.
This is the video of my build, I had used three inch pipe for my chimney, in hindsight I would have used 4″ and even probably 5″, I have to clean the chimney twice a month because we are having to use wood that is a bit wet.
Here is a link to the video I did on my build.
http://youtu.be/a9zBkLNgvYI
Hi Rob,
I have looked through your “I will try” site, and I think its a fine example of actively doing something about some of the problems we have created.
I decided to more or less copy your rocket stove. Is there any reason for not making the combustion chamber 4×6? I have a piece of such square tubing. How will combustion be effected by the length of the combustion chamber? What elevation does the exhaust pipe have to be in relation to the burn pipe? Are there any issues about making the exhaust a little bigger?
Your advice/opinions would be appreciated.
thanks
daniel
Hi daniel,
I think the design would actually benefit from a larger combustion chamber and larger exhaust. I can get away with smaller cross-section somewhat because I’m connecting to an existing fireplace and chimney that provides much more draft than the exhaust pipe otherwise would. I’ve been thinking of making another stove with smaller diameter body and with 4″x6″ tubing for the combustion chamber. The horizontal section of tubing would extend perhaps 12″ between the body of the stove and the vertical combustion chamber offering a 6″x12″ surface at very high temperature upon which one could heat a kettle or frying pan or whatever you like. But that is perhaps a project for another day.
Hi Rob just an update on my stove I completed, since I modified the flu at the 90 degree elbow and put in a clean out I have started using sawdust logs again, presto logs.
I have had zero problems with any build up of soot, as well soooo much longer burn times which is very nice.
I found that because of the wood that was sold to us was still wet caused the chimney to have soot build up so I would have to clean every two weeks, I went through a full cord of wood in three months.
Now that I am burning clean dry pressed logs I have not had to do any chimney cleaning for over a month.
I did design a presto/ sawdust log machine that I plan on building here in a month or so and find myself a few cabinet shops that will let me have their sawdust for free.
I like the idea of free heat, as well I am making a few changes to the stove this summer, plan on installing a glass window in the fire box, and as well one glass window so I can view the second burn that comes out of the burn tube.
I keep an eye on all your blogs, great stuff man.
Thanks so much for the great idea, hey even with the three inch pipe I have had no draft problems once I figured out what the cause of it was.
My ash door had air leaks, this caused a natural chimney effect up my feed chamber, once I got this sealed really well no more problems with getting a draft started.
Now it takes off every single time, no smoke rising to the top, not even near it.
Here is a link to my log press design, I am keeping this open source, if you do not want it here, go ahead and delete the link.
I think the update to the stove build would be somewhat of importance to anyone thinking of making the same build, especially with the early draft problems that I was able to solve.
http://youtu.be/o5B9XSZ0kDg
??? So… if you are burning wood…and heating the space…did you consider making the top flat, so you could cook on it too?
I have considered building one with a cook surface, mostly for the novelty of it. If I did, I would use the horizontal tube next to the combustion chamber. This could be made long enough to accommodate a pot or frying pan and it will get much hotter, much faster than the top of the stove. If I were to do that, I would probably make this tube 6″ wide to better support a pot. It could even be made modular so different combustion chamber/tube combinations could be swapped in. However, since the rocket stove provides only supplemental heat. There is little to be gained by cooking on it vs my electric stove/oven. Heating my home (reducing the output necessary from my electric space heaters) has exactly the same payback as heating my food (reducing the electrical output necessary from my stove) and the former is simpler.
Hi Rob,
Thanks for this. I have been making some stoves out of old Gas bottles, and I am now going to have a go at making a Rocket Stove using a old gas bottle, it will probably be a bit smaller than yours.
Just wondering how have you got on with this, are you still using it?
Hi Duncan,
I have burned my big pile of scrap wood but I still produce off-cuts from new projects so I still use the stove intermittently through the winter. It still works fine.
Hi Rob
Awesome blog and great build. I am looking at this project for cabin water heating. I was wondering how much space you leave between the chimney and the top of the tank? I see you have a block of wood supporting yours for the build. Is it just a piece of 2X.. ? Thanks again for taking the time o post.
Hi Glenn,
It was just a 2×4, I believe, so the gap is about 1.5 inches. The gap cross-section just needs to be greater than or equal to the chimney cross-section. Gap cross-section is circumference times gap = pi()*D*gap. Chimney cross-section is pi()*(D^2)/4. Therefore gap >= D/4. So for a 4″ diameter chimney, a gap of at least 1″ is recommended and a little extra isn’t going to hurt anything.
Well Rob, I made some modifications to my rocket stove heater which we used all winter long in our Rv.
What a difference it made, thanks so much again for posting your build, we were so miserable two winters ago even with gas heat and electric.
Take a look at the mod I did.
http://www.youtube.com/watch?v=ZL0ctzkXcdE
Hi Dale,
Nice build. Don’t listen to anyone who says it’s not a rocket stove. The defining characteristic of a rocket stove is the internal chimney or heat riser to generate a strong draft in the combustion chamber. Everything else is up to the imagination of the designer.
I used a chunk of 2×4 to set the clearance during welding, so my clearance was around 1.5?. All that is required though is that the area of the clearance (pi*diameter*clearance) is the same or greater than the area of the internal smoke stack (pi/4*diameter^2) so that you don’t have a restriction. If you do the math, that means the clearance needs to be greater than or equal to 1/4 of the internal diameter… so with my 3? smoke stack I could have gotten away with about 3/4?.
Rob: Second sentence. Do you mean volume instead of area? A little confusing.
This is an awesome project and makes me want to build one of these to replace my less-efficient wood stove with.
I have a few questions that I haven’t noticed anyone else ask, I am considering making one of these stoves out of an old water heater that is glass-lined. Do I want to break the glass out of the inside of the tank? I am guessing its something like porcelain? or am I totally off base..?
Your wood/feed box, You mentioned you sized it to 4×4 so you could fit 2 2×4’s in it and still get in air, Is there any reason not to use a bigger box, or taller? I ask because I would like to be able to load an hour, etc. more worth of wood into the stove, but not if it’s going to kill the draft..
With the thickness of the water heater tank do you have any concerns of burn through? I guess I only wonder about the top center above the chimney..
Last question is do you think there is any benefit to a larger diameter chimney?
Hi JT. I did mean area. Not volume. The cross sectional area of the flow path through the clearance is the circumference (pi*diameter) times the clearance height.
Hi Chris,
First off, thanks for reading all the comments to make sure your questions weren’t already answered. They are good questions.
I can’t say for certain, but I think you can probably ignore the glass lining. Worst case the glass may break off and collect in the bottom of your stove but it should not cause any harm. I think the thickness of a hot water tank is plenty to avoid burn through. The temperatures experienced by the tank walls are lower than in a typical wood stove. Its the combustion chamber and internal chimney that experience the high temperatures.
If you use a bigger feed box, you will likely not have enough draft unless you also increase the size of the internal chimney and exhaust tube. If I were to build another stove I would increase the diameter of the chimney and exhaust tube to 4″. 3″ is just what I happened to have in my scrap bin. If you increase the feed tube to say 6″x6″ square, then I would increase the internal chimney and exhaust tubes to 6″ diameter.
However… here’s the rub. Doubling the feed tube cross-sectional area (and increasing chimney and exhaust tube diameters appropriately to provide the necessary additional draft) will NOT double the burn time. It will instead double the power output. You’ll burn twice as much wood in the same time as before and your stove will get hotter and less efficient because the surface area of the stove is not large enough to transfer all that additional heat from the exhaust).
In a typical wood stove it’s not the amount of wood you put in that increases the burn time. It’s the restriction of air to the combustion zone. But restricting air to the combustion zone is also what makes typical wood stoves inefficient. It results in incomplete combustion (ash and carbon monoxide) and low combustion temperatures. It is much more efficient to increase burn time by regulating the supply of wood and keeping the supply of air at exactly what is needed to support efficient combustion (much like in a fuel injected engine where the air-fuel ratio is controlled over a wide range of power outputs using feedback from an oxygen sensor in the exhaust pipe… If you want a super efficient rocket stove, use an oxygen sensor in the exhaust to control a blower regulating air flow to the combustion zone).
So my advice is if you want to increase the burn time without decreasing efficiency, increase the feed tube length rather than its cross sectional area. If you do this you need to ensure that you have really good draft to keep the flames going downward so only the bottom few inches of the wood are burning. It takes my stove about 30 minutes to burn 6″ of 2×4. In theory I could have a 4 ft long 2×4 sticking up out of the feed tube and it should burn for 4 hours. However, in practice the wood feeds in too quickly under its own weight. You need to slow it down some how.
Thanks for the info. I will probably be going with a 4 inch firebox (not sure how tall yet), chimney pipe and exhaust.
One possible way to slow down the 2×4 from feeding too quickly would be to have your feed tube angled at 45 degrees. This would take some of the wood weight away and allow it to feed slower. Or maybe steeper, just not at the full 90 degrees.. I imagine with a little retrofitting the feed tube could have 2 pins and be able to rotate out and lock into place with a placement pin or something of the sort.. So long as it wasn’t allowing too much air to pass where it comes together.
could you comment on the longevity of your setup?
is still holding well? how often do you fire it etc?
at the forum there seems to be a lot of comments stating that the insulated chimney will not last if made of mild steel.
thanks!!
Modern fireplace inserts have firebrick lined combustion chambers that raise the temps to the combustion chambers and have secondary feed air tubes that inject heated air into the smoke stream to burn off the combustible particles in the smoke stream and achieve 80% efficiency as well. And they are UL listed. Yep, they cost more to buy, but in my humble opinion it is pretty cheap insurance rather than using dryer duct for routing products of combustion. Simply terminating the dryer hose in behind the glass doors of your fireplace doors means keeping the damper open 24 hours a day 365 days a year, and those glass doors are not air tight. You are undoubtedly seeing a lot of air infiltration into the house and up the chimney bypassing those doors. A quality wood stove fireplace insert would have a stainless chimney liner going up the chimney with the top capped off and sealed with high temperature sealant stopping that passive air loss. the space between the liner and the existing masonry flue would be filled with ceramic insulation. I am willing to bet the overall efficiency of a properly installed UL Listed fireplace insert would be higher and life safety issues would also be in favor of a UL listed stove.
@ lolailando, I rarely use the stove. It’s primarily for disposing of scrap lumber from other projects and I don’t have very much these days. However, the stove is still holding up.
@ Ray, why must the damper be left open 24/7? I close my damper whenever the stove is not being used. It’s a simple matter to open the fireplace doors and reopen the damper before lighting the stove. You are correct the glass doors are not air tight, nor is the damper. They are much more air tight now than they were before I installed the rocket stove. I saw to that with some well placed furnace cement and foil tape. You are correct that the efficiency is compromised since I haven’t eliminated all air infiltration up the chimney, but paying big bucks for a quality fireplace insert is not the only way to accomplish that. I could easily have sealed the doors completely. As for safety issues, I’m comfortable with my own assessment of the risk and don’t feel any need to defend it more than I already have.
What makes this different than a down draft gasifier? I would check your exhaust gas for flammability.
Hi andy,
The only thing that makes any wood stove different from a wood gasifier is the air/fuel ratio. If you burn “rich” (ie with not enough oxygen to support combustion of all the wood gas being generated) then you’ll be releasing unburned wood gas in the exhaust. As with any combustion process you need to supply a stoichiometric ratio of carbon to oxygen in order to achieve optimum efficiency with no unburned fuel or excess oxygen in the exhaust.
In practice, you can’t easily measure the exhaust contents during operation (though I have considered installing an oxygen sensor in the exhaust as an experiment). What you can do is open the air intake until opening it any further has no noticeable effect on combustion. Opening the intake beyond this point is introducing more air than is required to support combustion (and is decreasing efficiency by heating that air and expelling it from your home unnecessarily). Closing the intake from this point is introducing less air than is required to support combustion and will result in unburned wood gas in the exhaust. The same is true for any wood stove.
A rocket stove is better than a conventional wood stove at maintaining a relatively constant air/fuel ratio because the combustion zone is fairly constant in size during operation. As long as the rocket stove has been designed such that a wide open intake results in a “lean mix” (ie more oxygen than required), then the air/fuel ratio can be regulated by the method described above. The lid effectively acts as a choke. If the stove is poorly designed, such that a wide open intake already results in a “rich mix”, then there is no way of introducing enough oxygen to support combustion (short of adding a fan) and there will be wood gas in the exhaust. I will be the first to admit that my stove is NOT well designed in this regard. It was built with materials at hand which were not optimal and it has a tendency to run rich. However, I have tested the exhaust for flamability (match test) with negative results. Were I to build another one, I would increase the diameter of the internal chimney and exhaust tube. I have experimented successfully with adding a fan to the existing design. This allows regulating the air/fuel ratio simply by varying the speed of the fan, but I don’t care much for the added complexity.
A quick question if you do not mind. The building inspector will not allow me to put a wood stove of any sort in the garage. My thought is to put the guts of the machine outside the garage and to then run the duct into the garage through the back wall, perhaps creating a thermal mass through which to run it.
My question is how often do you have to add fuel to the system? I am wondering how incovenient it would be to have to trek outside in winter, not that we have tough winters in Buffalo NY mind you! 🙂
@ PaddyKevin,
I answered this in the article. See the “Warnings” section.
@ terry,
I think you would do fine with 4″ to 6″ intake. Other than the combustion chamber, the body of the stove will be cooler than most wood stoves. However, I still recommend lots of space between the stove and anything flammable, especially if you will leave the stove unattended.
I would like to down skill the rocket to use in a 16×20 work shop I have a couple of old propane tanks and other items. do you have any size suggestion for the intake and exhaust pipes I just worry about burning my shed down? and hello from Pascagoula Mississippi in the US and enjoyed the video.
Love this design. I’m going to use it to heat my 24×26 garage. I’m thinking of using a 100 lb propane tank. How far away from a wall would you figure I should keep it. also it wont be left unattended as I’m only going to use it while im in there. I was thinking of putting a fan behind it to bblow the warm air off of it and move the air around the garage. Fo this size should I still use a 3″ chimney and 4 ” exhaust? Thanks for the idea of this stove as I was frustarted as to how I was going to heat my garage this cold candian winter lol.
Really good post or article! I am thinking of this for a garage or shop type situation for the winter. with maybe just a small mass unit of say 5-6 feet. I have an old cast iron box wood stove thinking of using 6 inch stove pipe J-tube inside the stove covered with,rock sand clay or dirt. as in Kiss-keep it simple stupid! I think this is a great idea from the get go! My problem has been not finding smaller type units for people with limited space.
But I wonder if the “mass bench unit” could not be used in conjunction with a normal say gas or oil furnace or boiler chimney pipe connection to increase the effeciency. by say adding a blower type exhaust heat exchanger to blow the hot air through a thermal mass type bench set up say in a basement.
Or even some type of coiled copper pipe for thermal heat storage kind of like an indirect tank only it the heat is stored in the thermal mass instead of a water tank!
Anyway very good article young man! Good to see something different and in a different point of view!
Great post. I have a shed I use for wood carving that this would be great in. Quick question on exhaust. Due to the low temp exhaust gases involved, could something like this be vented into the same flue that a propane furnace or hot water heat is vented into in ones house if you were to put one in a basement?
Inspirational, Rob.
TU!
hi rob,
thanks for the very informative and helpful site.
I am building a RS that will vent up my chimney but set right in front of my firebox.
I am using a 55 G drum and 5″ steel square tubing for burn chamber.
If u could help me with these questions I would be grateful.
1. Do you need the extended length of dryer duct or is that just for more radient heat output?
2. I plan to paint barrel with high temp black paint. It looks like you did the same on your water heater.
My barrel is painted I assume I will need to remove the old paint before applying the high temp paint?
3. How did you build and insulate your chimney? I was going to use 4″ stove pipe (inner wall), vermiculte/clay insulation fill and 8″ furnace ducting (outer wall) Do you think that will work to trap enough heat in the chimney for the re-burn.
4. Is it necessary to insulate around the horizontal steel burn tube? It looks like you did not do that.
5. Since your stove is close to the wall I was wondering is the pink material at the end of your fireplace a regular wall or insulation material?
6. My stove will not be close to a wall, but 6 inches of the bottom will extend over the brick and I plan to build legs on the barrel and get it about 12 inches from the laminate floor. Will that be too close to the floor?
thanks for your help.
Hi tim,
1. The dryer duct is not required. It was just a convenient means for connecting my stove to the fireplace in a temporary manner. It does provide a little extra heat transfer.
2. Yes, it’s probably a good idea to remove the old paint before applying the stove paint.
3. I happened to have some ceramic fibre insulation that I used around the chimney. This is rated for very high temperatures (as high as fire brick) but I suspect a rock wool insulation such as Roxul would be sufficient (fiberglass insulation is probably not sufficient). Fibre-type insulators offer better insulation for less thickness than clay mixtures. I simply wrapped some aluminum tape around the outside of the insulation to hold it in place.
4. Insulating around the burn tube would be an improvement. The main purpose of the insulation is not for “re-burn”, but to increase the draft which is related to the difference in temperature between the inside and outside of the chimney.
5. The wall in the picture is just regular drywall. It’s actually a dark red, but showed up pink in the photo. I’ve measured the temperature of the wall at about 50 degrees C when the stove is roaring which doesn’t worry me enough to add a heat barrier.
6. The bottom of the barrel does not get very hot as most of the heat has been extracted from the exhaust by the time it reaches the bottom surface. So 12″ away from the floor is probably fine. The combustion chamber will get very hot but should be higher than the bottom of the barrel.
Your results may vary from mine as you have a larger combustion chamber.
@ Kevin,
I don’t recommend venting this into a flu currently being used for gas appliances. The exhaust is dirty and potentially corrosive. Only use piping designed for exhaust from a wood fire.
@ Dan, I’d recommend going a bit larger (perhaps 5-6″ tubing) if you want it to be a primary heat source for your garage through the winter.
thanks Rob for your complete response. It was very helpful.
I decided to build the chimney with fire brick and to insulate the square metal burn tube with fire brick also.
But not sure is I need a special high temp. mortar?
I also started thinking about the possibility of a rocket stove where the flame in the burn tube came from
propane or natural gas instead of wood. Wonder if you could get the side ways burn and proper draft and still capture the efficient radient heat from a small gas flame?
Thank you very much for all of the information you have provided. I would very much like to build a rocket stove but still have a few questions I have not been able to find an answer to. Perhaps you can help me.
I am planning on heating a small space and have no interest in any thermal mass. Also, it’s a fairly small space so I don’t really think I need anything like a water heater or 55 gallon drum, those may be to large. Looking around, it seems that a 30 gallon drum may be just the size I am needing. I am planning on 4″ square tube for the ‘J’ and 4″ round tube for the exhaust. With that being said, here are my questions:
1) How long should the feed tube be? You mentioned you are able to feed a 6″ 2×4 with no problems so I figure it should be at least 6″ but, is there an ideal length?
2) How long is the horizontal tube, from the feed tube to the interior exhaust tube. I have not been able to find any information regarding that.
3) How critical, if at all, is the exhaust port placement? Looking at your pictures it looks like you have it near the bottom, a little ways off to the side. Based on what I have read so far, it seems that higher would be bad, but does it matter where on the bottom it goes?
For anyone that cares, I am hoping to find a 30 gallon drum with a lever lock lid thing (I don’t know the real name, I hope you can understand what I am talking about). If I do find one, I will turn it upside down so when it is time to clean out the inside all I have to do is open the ‘lid’ and any crap will fall out. I am also hoping to add a sliding cover to the open end of the feed tube so I can ‘tune’ the burn.
I think that covers it. Thank you for the information and your time.
great post.thank you for detail description
I have yet to read all of the comments so this may have been addressed already. It has to do with using the center flue of a water heater tank as a heat riser. From my readings and experimenting the rocket stove relies on the heat riser being insulated so that it can get very hot. The increased heat of the riser causes the stove to more efficiently burn all of the wood gasses. By surrounding the heat riser with water you can’t get much above the boiling point of water. In effect you are chilling the very thing that you want to get very hot.
I also noticed in your picture that you have minimal insulation around the heat riser. This allows a much larger space inside of the containment barrel. In most rocket stove instructions I’ve seen, this space is kept to a minimum so that more heat is transmitted through the containment barrel and further speeds up the flame going into the heat riser.
All of that said-I have been doodling out designs of this nature for a while and was really pleased to see someone else working in the same direction. I am inspired to go outside and cut up the water heater I have been saving for this very purpose. I think that one of my variations will be to put a flange on the burn tube so that I can bolt it to the containment barrel as it will make experimenting or changing out the guts much easier. Thanks for you posting, I just stumbled across it a little while ago and am looking forward to reading through more of the posts. Jim
Hi Jim,
I agree the centre flue of a gas hot water tank cannot be used effectively as a heat riser in a rocket stove unless it is insulated.
Don’t underestimate the insulation around the internal heat riser in my design. It’s a ceramic fibre blanket which has 4-5 times the R-value per inch compared to fire brick that is more commonly used in rocket mass heater installations. So the 1″ of insulation in my design is thermally equivalent to 4-5″ of fire brick. You may be right that if the space around the chimney were smaller, it might develop a stronger draft, and the exhaust might give up more heat to the stove, but my main source of draft is the chimney of the fireplace next to the rocket stove, and the exhaust is plenty cool.
Good luck in your design.
No smoke? Hmmm… Have moonshiners heard about this?
Hey, Rob. Nice work! Keep the updates coming. I’m inspired to do one of these so that the exhaust runs in a thermal mass under the bank of windows on the south side on my house.
One of the things that may be eating the aluminum is Sodium/Potatssium Hydroxide (lye) from the ash of the burn. Hydroxides will react with aluminum and generate hydrogen. Eats the alunimum right up quick. Acids generally do not effect aluminum much at all, since this promotes the development of a protective coat of oxide (the basis of “anodizing” is reacting aluminum with a weak nitric acid solution with a current passed though the alumium item to the other electrod in the bath).
Also, with regard to increasing thermal mass in a hydronic storage unit, adding medium sized, rounded pebbles will double or triple the mass without increasing volumn. The water is then acting as a heat exchange fluid and the pebbles (which are 5-7x more thermal mass per volumn) act as the mass.
That’s what I have to add.
Back in the day there was an article in Mother Earth News (MEN) about a fellow in Minnesota (IIRC) who built this huge outdoor thermal mass heater with 180 feet of copper tubing, etc. His unit burned the fuel at hottest temp, too. I think that is key for effective burning, minimization of soot, etc. I was always attracted to that, but obviously never built one due to the major commitment needed. Your design has been an encouragement to me that one does not need to build a mountain in order to heat effeciently.
I am aware that what are called “condensing furnaces” (liquid fuels such as LP or oil) which are very high efficiency (94-96%) suffer from problems of condensation in the flue system that tend to force builders to resort to stainless steel for those components.
Due to this issue of condensation I will probably add a few things to my design such as a small incline of the flue pipe (about 1/4″ per foot) to a drain plug to allow drainage. If the flue gasses get below 100 C then condensation will start to occure.
Hi Rob,
You’ve been very diligent answering everyone’s e-mails. Hope you’ve got the energy to answer mine!
I made a rocket stove heater out of two 9kg LPG cylinders with the tops cut out and welded together. I used 3″ square tube for a firebox and feeder and 80mm pipe for the chimney, wrapped in thermal blanket. Epic fail! It wouldn’t draw, and basically filled the cavity up with unburnt smoke which then poured out of the external chimney (about 8′ high) in thick clouds. I’m figuring there must be some ratio between the height of the internal chimney to the height of the cylinder itself. I’m thinking of splicing in another 9kg cylinder with top and bottom cut out for extra height but before I go to all the trouble, thought I’d ask some advice, and namely, from you.
The total height of the cylinder is about 20″, the internal chimney is about 16″ and it sits maybe 2″ under the inside of the top. The exhaust is from the centre bottom, and the external chimney is about 8′. Splicing in another cylinder will add 8″, and I’ll add correspondingly to the internal chimney.
You may have no more idea than me whether this will work or not but any helpful advice gladly received!
Chris.
Hi Chris,
I suspect the extra 8 inches would help but I’m not certain it would be enough. The internal chimney in my stove is around 28″ high with about a 1.5″ gap at the top. It has just enough draft to keep itself going at the start. The draft improves considerably after 5-10 minutes of operation once there is a column of warm exhaust in the external chimney. If I were to build it again I would try to make it even taller than my current design.
Chris, your burn chamber has to be smaller than all other tubes to create the rapid suction that creates the heat for the jet. Your “chimney” must be 3 times longer than your draw tube or greater. 1.5-2 inches from the top of the outer can is ideal. Info here http://www.inspirationgreen.com/assets/images/Blog-Building/Rocket%20Heater/RocketHeater%20ernieanderica.info.jpg ratios, etc.
Rob, there’s a cool setup on youtube where a guy used stove gasket, bolts, and welded angle iron tabs to sandwich the two halves of his outer tank together. If you’re still worried about leaking through that stove tape that is. http://www.youtube.com/watch?v=q2eJec82D3I
Rocket heaters are great when they are built correctly. I found a company that builds cores. http://www.dragonheaters.com
Hi Rob,
I’m going to build one myself and am interested in the one with the water coils. I’m thinking of tying it in with my existing hot water radiator system as a pre-heater. Do you know where I could find more info on that system? If not could you put me in touch with John?
Thank you,
George
Hi, question about chimney. I have an existing chimney in my house because there used to be a wood stove there. My question is: can the flexible dryer tube point straight up, connecting to existing chimney? Or does the exhaust tube need to be placed a certain way in order to be effective?
Any info would be great, thanks,
Gish
Hi Gish,
The placement of the exhaust tube is not very important. The draft is generated by the hot exhaust in the stove’s internal chimney as well as the warm exhaust that will eventually fill your existing chimney. This draft will draw the exhaust through the exhaust duct regardless of its orientation.
Would it hurt to make combustion chamber taller so it would accept a 24 inch split logs? As the burning is from the bottom would it not last alot longer and almost be self feeding? On the same note would a larger chamber hurt? say a 12×12 inch? I would like to use this to heat my 800 square foot main floor. I am presently getting by with 3000 watts of electric heat, which is taxed when its -30 with a wind.
Hi Darcy,
A taller chamber would be fine. That is one of the things I would change if I were to build another one. A larger combustion chamber however would cause problems. There are two reasons for that: 1. You need to draw air into the combustion chamber at a fast enough rate to support the amount of fuel being burned at any given time. Increasing the size of the combustion chamber will increase the amount of fuel being burned but it won’t increase the draft. You’ll be trying to burn more fuel with the same amount of air and you will probably find your wood just smolders instead of burning well. 2. The hot exhaust from combustion wants to rise in the combustion chamber. It is the speed of the incoming air that forces the flames and exhaust downward. With a larger combustion chamber, the speed of incoming air will be reduced and you will likely find that the exhaust and flames will rise up in your combustion chamber and into your home rather than being drawn downward into the stove.
That reader “John” with the coil around the internal stack will certainly get hot water – but he will kill the whole function of the stack by cooling the flue gases, leading to potentially dangerous creosote buildup and lowering the efficiency of the stove – unless of course the stack is super insulated and therefore functioning merely as a hanger for the coil. The coil should be thermally separated from any combustion areas, essentially drawing heat only from the hot, completely burned exhaust gases. Proper placement therefore requires that he have an accurate picture of the internal burn patterns under all conditions, which is doubtful. I’m not being critical – it’s just the way these things work.
Also, have you busted your tack-welds to inspect the internals yet? I suspect that aluminum tape hasn’t fared too well near the top of the stove.
Cool build though!
Rob,
I need a little help if you have a minute.
I’m building my first Rocket heater, and it is modeled after yours.
I’m using 4″ steel tube for the fuel feed, and the horizontal chamber, then it switches to 4″ round for the vertical tube inside the drum. I have been testing with only some parts welded together at this time, so that I can make adjustments as needed.
I can’t get it to rocket. Right now it seems to be a very efficient woodstove with a tiny firebox. It draws well, but it is clear that it is not burning the wood gasses in the chamber, because I have all smoke coming out the flue.
I have adjusted the drum up and down from 1 1/4″ gap to 3 1/2″ gap.
Any suggestions ????
Hi Rob.
I have a brief question regarding the grate you made for your feed tube. I am using 4.5″x 4.5″ square stock for my feed tube, which equals roughly 20 square inches of surface area. I have read that the exhaust needs to be at least the same surface area as the feed tube.
If I use a similar grate, could I get away with using a 30%-40% smaller exhaust since the grate covers 30%-40% of the intake? Do you see any change in the performance of the stove with the grate on?
Thanks.
Hi Joel,
Actually the opposite is true. The strength of your draft is determined in part by the size of your exhaust. If you partially block the feed tube with a grate, you will require a stronger draft to get enough air into the feed tube to support combustion. Therefore you need a bigger exhaust, not a smaller one. Keep in mind, my stove is a little different from “rocket mass heater” designs in that it is connected directly to my existing chimney rather than a long exhaust tube. In my case the existing external chimney (rather than the internal one) generates most of the draft.
How many square feet of space in your home would you be able to heat if you did not have a backup?
Hi Jim,
If this stove were run continuously (24/7) I believe it would be sufficient to heat my entire home (2600 square feet) through the winter. Winters here are fairly mild with temperatures rarely going below 0 degrees C. However, it would be very difficult to run this stove continuously, as designed, since it needs to have more wood added every 30 minutes or so. I designed it only for burning small amounts of scrap wood.
I’ve just started to build my first rocket mass heater by re-purposing an old water heater, as you did. I’ve read through all the comments and questions, and did not see my concern addressed.
The reason I have an old water heater to use is because it was leaking, and we replaced it with a new one.
I’m assuming this is true of everyone that is using an old water heater.
How do you seal or deal with the holes in the previously leaking water heater to prevent carbon monoxide or carbon dioxide from leaking out?
Thanks!
Hi Keven,
In my case it’s not much of an issue. There were some tiny holes, but because my draft is generated primarily by the existing chimney of my house which PULLS the exhaust from the stove, air gets drawn into the holes rather than exhaust getting pushed out of them. If I were designing a typical rocket mass heater where the internal chimney (heat riser) PUSHES the exhaust through the stove, I would simply weld or braze over the holes.
Would appreciate any suggestions/plans to build rocket stove and connect to existing fireplace, but use outside air for combustion. Any help or ideas for plans would be nice.
Hi Warren,
I considered this as well. You could run an intake pipe through a wall, or down the existing chimney (not ideal since the incoming air will be warmed, reducing draft) and connect it to the side of the combustion chamber near the top. Load and light the wood as normal and once you have good draft (in the right direction) simply put a lid on the top of the feed tube. Now air will be drawn from the intake tube instead of from the room.
Hey Rob.
Great design! I have just started to build mine, based off of yours. I do have some changes, just out of what I could get to build it. I have one question (for now, lol) do you know a good mixing ratio for furnace cement to perlite. it is for insulating the rise. I know you did not use that but figured it was worth a shot. Thank you for any info. Thank you for sharing your design!!!
Hi Wayne,
Coincidentally, I have used perlite mixed with furnace cement to make a castable refractory for another project (electric furnace for heat treating metals). I used a 1:4 mix of furnace cement to dry perlite by volume and it seems to work fine. You can find more info here:
http://makezine.com/2012/04/05/how-tohomemade-castable-refractories/
Hi everyone,
I am a fairly new member to the Rocket Heater/J-Tube construction (I have built 2 Rocket Heaters in 4 months) and have a question about the BTU’s per pound of wood being burned in a Rocket Heater. Most all of the charts available on the internet put wood at an average of 8,600 BTU’s per pound of wood for energy output. When I was researching how much heat was being generated by Rocket Heaters for so little fuel being used, the amount of heat, pounds of wood, and total BTU’s did not make any sense what so ever. After doing some MAJOR digging, I ran across a paper that was funded by the EPA and published by Intertek( http://www.epa.gov/burnwise/workshop2011/WoodCombustion-Curkeet.pdf ).
The question I have is what BTU numbers are really correct for burning wood in a Rocket Heater/J-Tube constructed appliance? The EPA funded study says that if you achieve 100% combustion (carbon and gases from pryolysis) you will achieve just over 15,000 BTU’s per pound of wood. If anyone could give me a better source of information, I would appreciate it.
Hey Rob. Your article has inspired me to build a rocket stove of my own from a hot water service cylinder, about 14 inch diameter and 32 high. I’m a 5 inch square for the burn chamber and 4 for the vertical, as well as 4 for the outer feeder tube. Having recently completed a test burn I noticed still a lot of heat in the flue which indicates a degree of heat loss and have thought about ways to address this. One theory I’m thinking of is baffle plating the inside of the cylinder. Having installed a flat baffle plate in my home made open combustion heater, located in the top rear of the firebox below the flue to draw the flames up and around to absorb more heat, has increased the heat output of the heater and consumption of fuel significantly.
My idea with the rocket stove water cylinder was to weld 2 to perhaps 4 semi or quasi – circular flat steel plates equally spaced from the top part of the cylinder to just above the exhaust outlet, but opposed equally to each other as they go down. The idea is more heat will be absorbed by the plates as the hot gases travel through these semi – open chambers to the exit. In my theory the extra heat will be radiated out through the cylinder inside instead of into the flue to outside. What do you think of this? Thanks, Steve.
Hi Rob
Have you had a look into your chimney now that it’s been running for a couple of years? I have built a rocket stove myself but vent it through the wall and out but notice the large amount of vapour that comes out of the exhaust. My concern is that if the temperature at the chimney is 60deg C that water will be condensing on the colder (25deg C) chimney walls and then running down. I wonder if there is enough heat and draft coming out of the end of the rocket stove to get rid of all the moisture or is it seeping into the chimney walls?
Great work – you were the first to inspire me to make a rocket stove and like you I have been amazed at the efficiency and HEAT the thing produces. I’ve made mine with a feed tube that burns pallet wood and 3 pieces of wood lasts for 2 hours of burn and heats my 3 bedroom house really well.
Robert
Hi RD,
I have inspected the interior walls of the fireplace and chimney and they seem unaffected. light condensation is visible in rare cases on the glass doors of the fireplace just after starting the stove but it quickly evaporates after the stove is burning well. Do keep in mind I burn very dry wood. Mostly it is scraps from woodworking projects that I cut it into small pieces and store indoors until winter.
Rob,
I’ve read everything, including every comment.
Forgive me if I missed it……but did not see anywhere on what size water heater you used?
Also, it would help me greatly if you could give rough sizes of the length of the square tube outside part, part going into water heater and the length of round 3″ tube. (I read the height of inside but not sure if this was the tube or tube and square tube combined?)
Hi Kyle,
The water heater I used was just what I happened to have on hand. I suggest using whatever you can find, but if you want actual dimensions, my stove is 18″ in diameter by 36″ high. The original water heater was taller, but I cut a section out of it so the stove would fit where I wanted to put it. Longer is better since you will get better draft.
The combustion chamber (vertical square tube) is 4″x4″x11″. You should be able to judge everything else from the pictures.
When I built it, I just used what I had on hand. If you’re buying materials, I suggest making all the tubing bigger (ex use 6″ square tubing and/or 6″ round tubing throughout).
Hey Kyle,
Do you have the contact info for John who used the copper coil in the above photos? I have a few technical questions for him… thanks
Thanks for your great article and all of the informative comments as well. I have been researching a system to incorporate with my son’s Forge to reduce the smoke emissions and use the high energy that is being wasted This is the best article I have found yet 🙂
I wonder if you or any of your followers have seen a secondary burn system set up for this purpose. The much higher temps require some accommodating and the dirty coal exhaust will be a different chemical combination than the wood i think but so far it seems the best design is a rocket stove draw system, the forge being in place of the fire box, to copper wrapped pipes in a concrete bench… I’m hoping to transfer the energy through the copper pipes to a water heater of sorts….then a bubbler at the end of the chamber to act as a scrubber before it exits the chimney.
Are there any thoughts or improvements you can offer?
Thanks.
Rob, Nicely documented project, & a worthy use of otherwise scrap material. I have been searching for a friend that is moving to SW Missouri soon. He has 30+ acres with a lot of hardwood trees & dead fall & standing. He has a shop on site he wants to heat in the winter, but besides the water being the best thermal mass, I wonder if a scrap steel plate 1 or more inches thick might not be better. Could cook on it during power outages.
Still, well built, documented, & good reader comments too!
Thanks in advance.
Hi! Your ideas look very good and you are clearly learning and experimenting with Rocket Stove technology. This is very inspiring. Is there a commercially available Rocket Stove I can install in my basement for home heating and/or water heating? One that has an automatic feed so I can leave it burning when I go to work? Or is the technology too new to meet those requirements? Please let me know, Thank you!
hii,
do you think your firewood feeding port is a little bit small ?
i can’t imagine you have to feed the wood every so often in the cold winter night… or even when you are sleeping.
do you have video of the RMH that you build ? it will be easier for me to see then pictures..
how about the reader John who sent you the picture of his RHM using water tank ?
does he has any more detailed photo or video ?? using water as heat storage is my idea of thermal mass at home, because we need to use hot water anyway..
but the issue is , most probably i can’t use steel, it will rust… and using stainless steel.. it will be not easy.. at least for me.
hii,
btw, did your RMH core broken down yet ?
i believe your RMH will not last for long, since it is wrapped in aluminum foil.
i wonder what is the best lasting core for it.. fire brick core ?
boy firebrick is like gold price here in germany.
regards,
Hi andrew,
If my goal were to heat my home entirely with this stove, then yes, the combustion chamber (actually the whole stove) is smaller than I would need. But my goal, stated in the article, was to efficiently burn wood scraps from my projects, providing only supplemental heat. For that purpose, this stove is a good size for my needs.
The size of the combustion chamber needs to be matched to the size of the heat exchanger and the tubing used throughout. If you simply increased the size of the combustion chamber in this design the stove would not function well. There would not be sufficient draft to support combustion of more than a handful of wood not to mention preventing smoke and flames rising from the combustion chamber into your home. If you artificially increased the draft (ex via electric exhaust fan), you would get good combustion but exhaust temperatures would rise since you can’t extract all the extra heat without increasing the radiating surface area or adding thermal mass.
If I were to use the existing design as a primary heat source in winter I would need to keep it burning continuously during waking hours. I have been experimenting with this recently and it works fine but of course it is inconvenient to keep feeding the stove. It’s simply not what I designed it for. If you want to design for that, the entire stove needs to be bigger and you need thermal mass to store the heat. Another option is to keep the stove small and rig up some kind of automatic feed system (ie a pellet stove), but then you are limited in what kinds of fuel you can burn.
I have taken apart the stove recently. After 6 winters of use the aluminum foil tape shows no sign of deterioration. The combustion chamber and heat riser are 1/8″ wall steel pipe and are also showing no sign of deterioration.
Sorry I do not have any videos.
I have been interested in rocket stoves since first learning of them because of the way they work. I thought it would make a cool camp stove or….
This website has inspired me to get active in pursuing a finished stove as this is my second winter here and they are long and cold. Kerosene heaters in the shop just don’t do it. This site looks to have informative and intelligent conversations and some good links.
Thanks for putting it out there.
I like the simplicity of your design. Of like to build a rocket heater but I have several questions I have not been able to answer. Most examples online are large (3+ ft high etc). I need to build one for a small space (maybe 15-18 inches high) so I’m looking for information on relative dimensions.
1. The volume of the burn chamber relative to the volume and height of the chimney and the volume of the outer barrel etc.
How does changing dimensions effect performance and efficiency?
Yours has a large outer chamber relative to the chimney. I suspect that will slow the airflow through that area allowing more heat transfer. Yes?
2. Volume of primary air required (I’d like to plumb it from outside) and volume if secondary air fed into the chimney. How much is needed?
3. Materials of burn chamber. I’ve seen some videos of rocket heaters that are built with lighter weight materials that don’t hold up, so some info on appropriate materials for long life would be nice.
I’m considering a burn chamber as small as 2×2 steel square tube. I’d only be able to burn 1 in diameter sticks or less, but its a small space I’m trying to heat and having a small wood pile would help.
Has any one with knowledge of thermal dynamics done the calculations for determining relative sizes for rocket stove design!
Thanks
Great article very impressive nicely explained
Hey Rob,
I hope you still comment here
The one with the water heater option, any mote détales on that? I would like to make one of my own
A couple points:
1) It’s indicated waterglass, sodium silicate, can be mixed with talc and baked to create a kind of soapstone.
Back in the Obama Cars for Clunker days, sodium silicate was poured in engines to destroy them. That meant a lot of bulk purchases of waterglass. In fact, I almost bought a fifty-five gallon drum of waterglass off craigslist when that program shut down.
2) Obviously, something solid does not magically disappear by heating it to high temperatures.
Just removing the, approximately, twenty percent moisture content will, seriously, reduce the weight. Run some shrimp, ice cream, veggies or what have you through a freeze dryer and any doubt to this will be gone. Those shrimp go from nice, firm little, tasty morsels to Styrofoam.
What is left has to go somewhere, either out the stack or to the bottom of the burner, for our purposes. Another example would be cremation ashes.
Since rocket stoves move and eat a lot of air, it stands to reason much of what is burned is being carried out into atmosphere.
Woodworkers and those in other industries use things called cyclones to spin the air and drop particles out in a container. They are about ninety-nine percent effective. Though that figure may drop if things in the air are small and light. Still, the cyclone, depending on the design, would remove a lot of particles.
The one problem with cyclones is, they rely on air movement and inhibit it somewhat. But, where there is no solution, there can’t be a problem, right?
Are you going to be manufacturing any wood stoves? if so, could you send me information on your stove. I am placing it on my hearth, venting into the existing chimney.