Author’s note, 2015-02-14:
- Based on the interest I’ve received in this project, I’m considering selling plans for a stove similar to the one described in this article. See the Rocket Stove Plans section at the end of the article and let me know if you’d be interested.
Original article:
For some time I’ve been considering the best way to deal with a pile of scrap wood that has been growing next to my home, the result of many woodworking and carpentry projects I’ve been involved in over the years. A few options I have considered are:
- taking it to the landfill
- cutting it into chips and using it as mulch
- burning it
From a climate change standpoint, the latter of these is surprisingly the least harmful in the long run. Mulching or burying do postpone carbon release to the atmosphere, but the carbon will be released eventually regardless. What’s worse, mulching or burying the wood will result in some anaerobic decomposition (that is decomposition in an oxygen deprived environment) which will result in the production of methane, a far more harmful greenhouse gas than carbon dioxide.
Burning also has a side benefit. It releases energy which may be captured and put to some use. Scrap wood and yard trimmings are burned in backyards across the country each year without any attempt to capture that useful energy. Rather than simply “disappearing” my pile of scrap wood, I wanted to extract as much value as possible by heating my home with it. To do so most efficiently, I built an ultra-efficient wood burning stove, more commonly referred to as a “rocket stove’. Rocket stove designs are most often used for small cook stoves but larger stoves for home heating are not unheard of. They are often referred to as rocket mass heaters.
Ads by Google
Warnings
Fire is dangerous. Building and operating your own wood stove of any design will almost certainly void any fire insurance you may have on your home and may also pose a serious risk to you and your family. As far as wood stoves go, a rocket stove is probably one of the safest designs since the combustion chamber is tiny, the exhaust volume is low, the draft is strong, and the bulk of the exterior of the stove does not reach very high temperatures. However, as with any combustion appliance, there are some precautions you should follow.
0. Locate the stove well away from anything flammable. At least 18″ is recommended by most building codes for ordinary fireplaces and wood stoves.
1. Keep a watchful eye on your stove whenever it’s burning. With an average load of wood my stove burns for about 30 minutes before requiring more fuel. I consider this short burn time to be not a burden but a safety feature, and I don’t mind it at all since there’s a certain pleasure that comes from putting another log on the fire.
2. Don’t burn treated or manufactured woods. Treated wood, plywood, OSB, etc all contain chemicals that will be released into the exhaust during combustion. You certainly don’t want to breath these and you probably don’t want to put them into the atmosphere. You should only burn untreated solid wood.
3. Install a smoke detector. Smoke detectors are required by most building codes, so you probably already have one. However, if you build a rocket stove for heating a garage or outbuilding, you should probably install a smoke detector there as well.
4. Install a carbon monoxide detector. All combustion appliances are capable of producing carbon monoxide which can be deadly if it is released into your home. Other combustion appliances in your home such as a furnace or hot water tank are probably a greater carbon monoxide threat that the rocket stove described in this article since they operate continuously, unattended, even while you sleep. That said installing a carbon monoxide detector is a wise precaution.
How is a rocket stove different from a regular wood stove?
The goal of a rocket stove is to burn a relatively small amount of wood at as high a temperature as possible, resulting in more complete combustion, and to extract as much heat as possible from the exhaust gases. To generate high combustion temperatures, rocket stoves separate the combustion, heat extraction and exhaust functions. They have insulated internal chimneys to generate a strong draft for vigorous combustion. My design uses a down draft combustion chamber. Scrap wood is loaded directly on top of the existing burning wood inside the combustion chamber. The flame is drawn downward by the strong draft rather than rising out of the chamber as one might expect. The result is that ALL combustion products pass through the hottest part of the fire resulting in very complete combustion, producing the greatest amount of heat and reducing products of incomplete combustion such as carbon monoxide and smoke. To capture as much of the heat as possible and radiate it into the room, the exhaust gases are passed through a secondary chamber (much larger than the combustion chamber) that absorbs and radiates the heat. Finally the relatively cool exhaust gases are expelled through an exhaust tube.
The following illustration shows the basic design.

Insulating the chimney ensures a large temperature difference between the exhaust gases inside the chimney and those outside it. This temperature difference causes a density imbalance resulting in a strong draft. The hot exhaust gases in the chimney rise, while the cooler exhaust gases outside the chimney fall, and the whole process draws fresh air into the combustion chamber, supporting vigorous combustion. In my design, the radiating chamber is about 18″ in diameter by about 36″ high, while the combustion chamber is only about 4″ by 4″ by 10″. Don’t let the overall size of the stove fool you. It only burns a couple handfuls of wood at a time. The large size is required to absorb and radiate the heat, not to contain the fuel.
Ads by Google
Construction
Rocket stove mass heaters are often built from steel drums. These are convenient since they have a flat top that can also be used for cooking. I did not have one handy though. What I did have was my parents’ old electric hot water tank that they had just replaced since it was corroded and leaking. In addition to this I used some 3″ diameter steel pipe, some 4″x4″ square tubing, and some flat steel plate, all about 1/8″ wall thickness (though that is probably thicker than necessary). I also used some flexible aluminum tubing (dryer ducting) to feed the exhaust from the rocket stove into my existing fireplace.

Above is a picture of the internal parts of the stove (combustion chamber and chimney) set up for initial testing to make sure it would generate enough draft for vigorous combustion. The aluminum flex tubing is connected to the top of the chimney for testing only. In the finished product it will be connected to the side of the stove. The chimney is insulated with about 1″ of Roxul (a rock wool insulation that will tolerate higher temperatures than fiberglass insulation) and wrapped with adhesive aluminum furnace tape to hold the insulation in place.

The above image shows the hot water tank cut to accept the combustion chamber and chimney.

The above image shows the combustion chamber and chimney being welded into the side of the hot water tank. Note the block of wood between the end of the chimney and the inside surface of the tank to ensure an appropriate gap for the exhaust gases. This piece of wood will be removed after the chimney is welded in place.

Mad scientist at work…

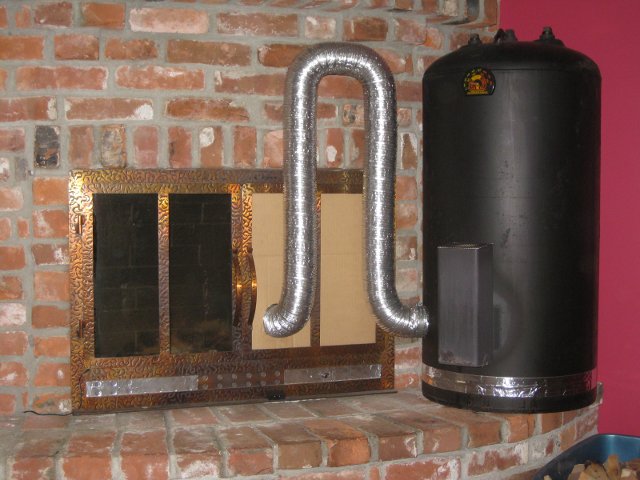
… and after a bunch more welding and a paint job that I neglected to take any pictures of … viola! … the finished product. The silver band around the bottom isn’t a racing stripe. It covers the seam where I tack welded the bottom of the tank back on. I did not want to weld it on permanently since I may want to disassemble the stove later for inspection.

Notice that I removed a glass pane from the left door of my fire place and replaced it with cardboard. The aluminum flex tube passes snugly through a hole cut in the cardboard to expel the exhaust gases into the fireplace where, still warm, they rise and exit through the existing chimney. I know you’re probably thinking I must be crazy to use a combustible material like cardboard for this purpose, but the fact is that the exhaust volume from this stove is so low and the stove is so efficient at removing heat from the exhaust that this aluminum tube reaches a maximum temperature of only about 60 degrees C during operation. That’s cooler than a typical cup of coffee. The top of the stove gets much hotter, of course.

I also made a simple metal screen that can be placed over the combustion chamber to prevent sparks from popping out into the room where they could ignite something (or more likely just leave burn marks as they smolder on the carpet). I have another cover, not shown, that is a solid steel plate. It’s useful to quickly extinguish the fire and to prevent air infiltration when the stove is not in use.

Above is a photo of the cleanout. The plate which makes up the bottom of the combustion chamber is removable. I just slide it out as shown in the photo and the ash drops into any suitable receptacle (I’m using a plastic tray above). I’ve found it best to clean the ash out every week or so as once there is more than about a cup full it will fill the bottom of the combustion chamber and start to build up in the tube between the combustion chamber and the internal chimney. Then it’s a little harder to get to and it will eventually start to reduce the draft. In hindsight, access through the side of the combustion chamber instead of the bottom would have been more useful.
Does it work?
Well… actually … it works too well. The difference between burning wood in the fireplace and burning wood in this stove is incredible. You really have to experience it to believe you can get so much heat from a small handful of wood. I’ve fed my fireplace for hours with hardly any change in room temperature but it only takes a few minutes for the rocket stove to raise the room temperature noticeably. It may take a long time to get through all my scrap wood at this rate. Feeding the stove every evening after work, I have only managed to go through about one bin (perhaps 20kg) of wood per week. Part of the issue is the season. It just doesn’t take much heat to get the house to a comfortable temperature right now in early spring. I will be able to burn a lot more wood in the stove next winter.
Savings
On average the heat energy available from burning wood is around 4.5 kWh per kg (assuming a 20% moisture content). Assuming roughly 80% efficiency of the stove (just a rough guess) the heat extracted will be about 3.5 kWh per kg. I heat my home with electricity that costs about $0.07 per kWh. Therefore, the heating value of my scrap wood is about $0.25 per kg and by burning about 20kg per week I save about $5 per week on heating costs or about 50% of my heating bill for this time of year. Savings will be much greater in winter when the stove can be operated more frequently without the room becoming uncomfortably hot.
Why not just buy a fireplace insert?
I considered buying a fireplace insert but after learning about rocket stoves I quickly dismissed the idea because:
- an insert would almost certainly be less efficient
- it would require significantly more cost and effort to install
- it wouldn’t provide nearly the same conversation value
- I would not be able to re-purpose existing waste material such as my parents hot water heater
- it would not be portable (I look forward to operating my rocket stove on our patio on cool summer evenings).
Ads by Google
What about adding thermal mass? Would that be more efficient?
Wood stoves used as a primary heat source for a home will derive significant benefits from thermal mass (imagine replacing my short length of aluminum flex tube with 30 or 40 feet of duct buried inside a couple tons of concrete and you’ll have the right idea). The thermal mass stores heat and releases it slowly into the home, evening out the temperature and allowing the stove to be operated intermittently.
However, for a stove like mine that’s used only for supplemental heating, thermal mass is not of much benefit since an even temperature can be maintained simply by varying the heat input from the primary system (which happens automatically since it is controlled by a thermostat). For example, when I operate my rocket stove in the winter, my electric heaters automatically cut back such that the house temperature does not rise significantly.
It is also worth noting that thermal mass, by itself, does not improve efficiency. Improved efficiency is often a side effect of adding thermal mass, but the improvement is really just a result of extracting more heat from the exhaust gases. This could be accomplished just as easily without adding any thermal mass. For example, I could extract more heat from my exhaust simply by using a longer piece of aluminum duct between the stove and fireplace (I have noted that the exhaust temperature drops about half way to ambient for every 20cm of tube length).
So in a nut shell, thermal mass is not really that useful for a stove that’s intended for use only as supplemental heat, if the primary heating system is on a thermostat.
Additional resources
There is a lot of information about rocket stoves online. A Google search on “rocket stove” or “rocket mass heater” will yield good results but www.rocketstove.org is a good place to start. There is also an excellent book called Rocket Mass Heaters available for purchase in PDF format at www.rocketstoves.com.
Paul Wheaton, founder of permies.com has put together an extensive set of DVDs on Rocket Stoves, available on Amazon, titled Wood Burning Stoves 2
Erica and Ernie Wisner, of ernieanderica.info, who were also involved in producing the DVDs above, will be launching a new book in June of 2016. You can pre-order it on Amazon: The Rocket Mass Heater Builder’s Guide
Rocket Stove Plans
Update 2015-02-14: A few readers have emailed me asking if there is any way they could purchase detailed plans so they can build a stove similar to mine or get a welder to build one for them. I don’t currently have any such plans to offer, but if there is enough interest, I would consider building an improved stove (I’ve learned a lot from using this one for the past several years) and documenting the process in more detail with the intent of selling the plans. To gauge interest, I’ve created the following very brief survey.
Reader Projects
If anyone out there decides to build a rocket stove based on this or a similar design, I would be happy to post some pictures of your project, or if you have your own site, let me know and I will post a link below.
2010-12-13: One reader, Brent, built his own rocket stove following a similar design (though he was clever enough to put the cleanout in the side of the combustion chamber rather than the bottom). You can read more about his stove in the comments, or take a look at some pictures and a video on Brent’s blog: http://streetjesus.blogspot.com/2010/12/rocket-mass-heater-project.html.
2012-11-26: Another reader, John, sent me these pictures of his project. He’s using a large water reservoir for thermal mass with a coil of copper tubing wrapped around the internal chimney of the stove for heat transfer.


Happy burning!